Follow Me On Social Media!
The Ultimate Crispy Buttermilk Chicken Tenders Basket (Better Than Takeout!)
There is something undeniably nostalgic and universally comforting about a basket of perfectly fried chicken tenders. It’s the meal that transcends age groups—a favorite of children and a guilty pleasure for adults. But we aren’t talking about the frozen, shaped nuggets from a bag. We are talking about the “Holy Grail” of comfort food: The Crispy Buttermilk Chicken Tender Basket.
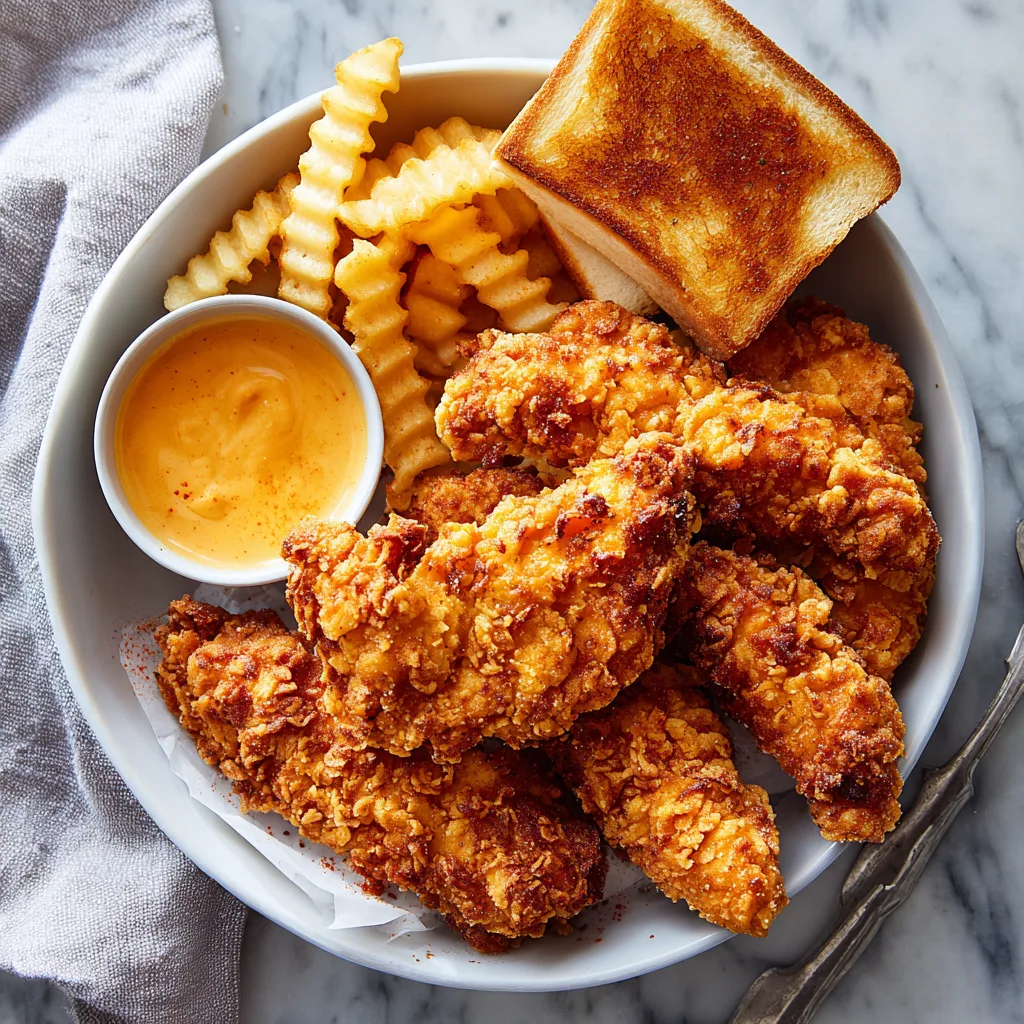
If you have ever waited in a long drive-thru line for that famous finger-food combo with the crinkle-cut fries, the buttery Texas toast, and that addictive, peppery dipping sauce, you know exactly what I’m talking about. The good news? You can make it at home, and dare I say, you can make it better.
This recipe focuses on achieving that shattered-glass crispy exterior while keeping the meat juicy and tender on the inside. We pair it with homemade garlic-buttered Texas toast, crispy golden crinkle fries, and a signature sauce that hits every savory, tangy, and creamy note you crave.
The Science of the Crunch: Why Buttermilk Matters
The secret to restaurant-quality chicken strips lies in the marinade. You cannot simply dredge raw chicken in flour and expect greatness. You need an acidic medium to break down the proteins and tenderize the meat. This is where buttermilk shines.
Soaking your chicken tenderloins in a seasoned buttermilk mixture does two things:
- Tenderization: The lactic acid in the buttermilk gently breaks down the fibrous tissue in the chicken, ensuring that every bite is melt-in-your-mouth soft.
- Flavor Penetration: By seasoning the liquid marinade, you are infusing flavor deep into the meat, not just sitting it on top of the crust.
If you don’t have buttermilk on hand, don’t panic. You can make a quick substitute by adding a tablespoon of white vinegar or lemon juice to a cup of regular milk and letting it sit for five minutes. It works like a charm.
The Dredge: Flour vs. Cornstarch
Have you ever fried chicken and found the crust was heavy, soggy, or dark brown before the meat was cooked? That is usually an issue with the coating ingredients.
For this recipe, we use a blend of All-Purpose Flour and Cornstarch. The flour provides the base and the classic flavor, while the cornstarch inhibits gluten formation. This allows the crust to get incredibly crispy—almost shattering when you bite into it—without becoming tough or chewy. The addition of baking powder also creates tiny air bubbles in the crust when it hits the hot oil, adding surface area and extra crunch.
The Signature Dipping Sauce
Let’s be honest: the chicken is the vehicle, but the sauce is the destination. This sauce is a creamy, mayonnaise-based dip with a kick of garlic, black pepper, and Worcestershire sauce. It’s savory, slightly tangy, and has just enough heat to cut through the richness of the fried food. It is best made at least an hour ahead of time to let the flavors meld together in the refrigerator.
Ingredients
For the Chicken Marinade:
- 2 lbs chicken tenderloins (fresh, white tendon removed)
- 1 ½ cups buttermilk (full fat is best)
- 1 large egg
- 1 teaspoon garlic powder
- 1 teaspoon salt
For the Breading (The Dredge):
- 2 cups all-purpose flour
- ½ cup cornstarch
- 1 tablespoon baking powder
- 1 tablespoon garlic powder
- 1 tablespoon onion powder
- 1 tablespoon paprika (smoked or sweet)
- 1 teaspoon cayenne pepper (adjust for spice level)
- 2 teaspoons freshly cracked black pepper
- 1 ½ teaspoons salt
- Vegetable or Canola oil for frying
For the Signature Sauce:
- ½ cup mayonnaise
- ¼ cup ketchup
- ½ teaspoon garlic salt
- 1 teaspoon Worcestershire sauce
- ½ teaspoon coarsely ground black pepper (add more to taste)
- A splash of hot sauce (optional)
For the Sides:
- 1 bag frozen crinkle-cut fries (or 4 Russet potatoes, cut and fried)
- 4-6 slices of thick Texas Toast bread (or thick-cut brioche)
- 3 tablespoons salted butter, melted
- ½ teaspoon garlic powder
- 1 teaspoon dried parsley
Instructions
1. Prepare the Chicken Start by cleaning your chicken tenderloins. You may notice a white tendon sticking out of the top of the tenderloin. To remove this easily, grip the end of the tendon with a paper towel, place a fork over the tendon against the meat, and pull the tendon through the fork tines. It should slide right out.
In a large bowl, whisk together the buttermilk, egg, 1 teaspoon of garlic powder, and 1 teaspoon of salt. Add the chicken tenders, ensuring they are fully submerged. Cover and refrigerate for at least 1 hour, or up to 24 hours for maximum tenderness.
2. Make the Sauce While the chicken marinates, prepare the sauce. In a small bowl, whisk together the mayonnaise, ketchup, garlic salt, Worcestershire sauce, black pepper, and hot sauce. Cover and place in the fridge. The flavors need time to marry; the pepper flavor will become more pronounced as it sits.
3. Set Up the Breading Station In a large, shallow dish (a pie plate works well), whisk together the flour, cornstarch, baking powder, and all the dry spices (garlic powder, onion powder, paprika, cayenne, black pepper, salt).
Pro Tip: Take 2-3 tablespoons of the wet buttermilk marinade from the chicken bowl and drizzle it into the dry flour mixture. Use a fork to work it in until you have little craggy lumps. These lumps will stick to the chicken and create those extra-crispy bits we all love.
4. Dredge the Chicken Remove a tender from the marinade, letting the excess drip off slightly. Press it firmly into the flour mixture. Flip it and press again. You want the flour to really adhere. Shake off any loose flour and place the breaded tender on a wire rack. Repeat with all pieces. Let the breaded chicken sit on the rack for about 10 minutes—this helps the coating “set” so it doesn’t fall off in the oil.
5. Heat the Oil Fill a Dutch oven or deep cast-iron skillet with about 2-3 inches of oil. Heat the oil to 350°F (175°C). If you don’t have a thermometer, you can test the oil by dropping a small piece of breading in; if it sizzles and floats immediately, it’s ready.
6. Fry the Chicken Fry the tenders in batches—do not overcrowd the pan, or the oil temperature will drop, leading to greasy chicken. Fry for 5-6 minutes, flipping halfway through, until they are a deep golden brown and the internal temperature reaches 165°F (74°C).
Transfer the cooked tenders to a clean wire rack placed over a baking sheet. Do not place them on paper towels, as the steam will get trapped and make the bottom soggy. Keep them warm in a 200°F oven while you finish the rest.
7. Prepare the Sides
- Fries: While the chicken is frying (or in a separate fryer/oven), cook your crinkle-cut fries according to the package directions or fry them in the same oil after the chicken is done for extra flavor.
- Texas Toast: Mix the melted butter with garlic powder and parsley. Brush both sides of the thick bread slices. Toast in a skillet over medium heat until golden brown on both sides, about 2-3 minutes per side.
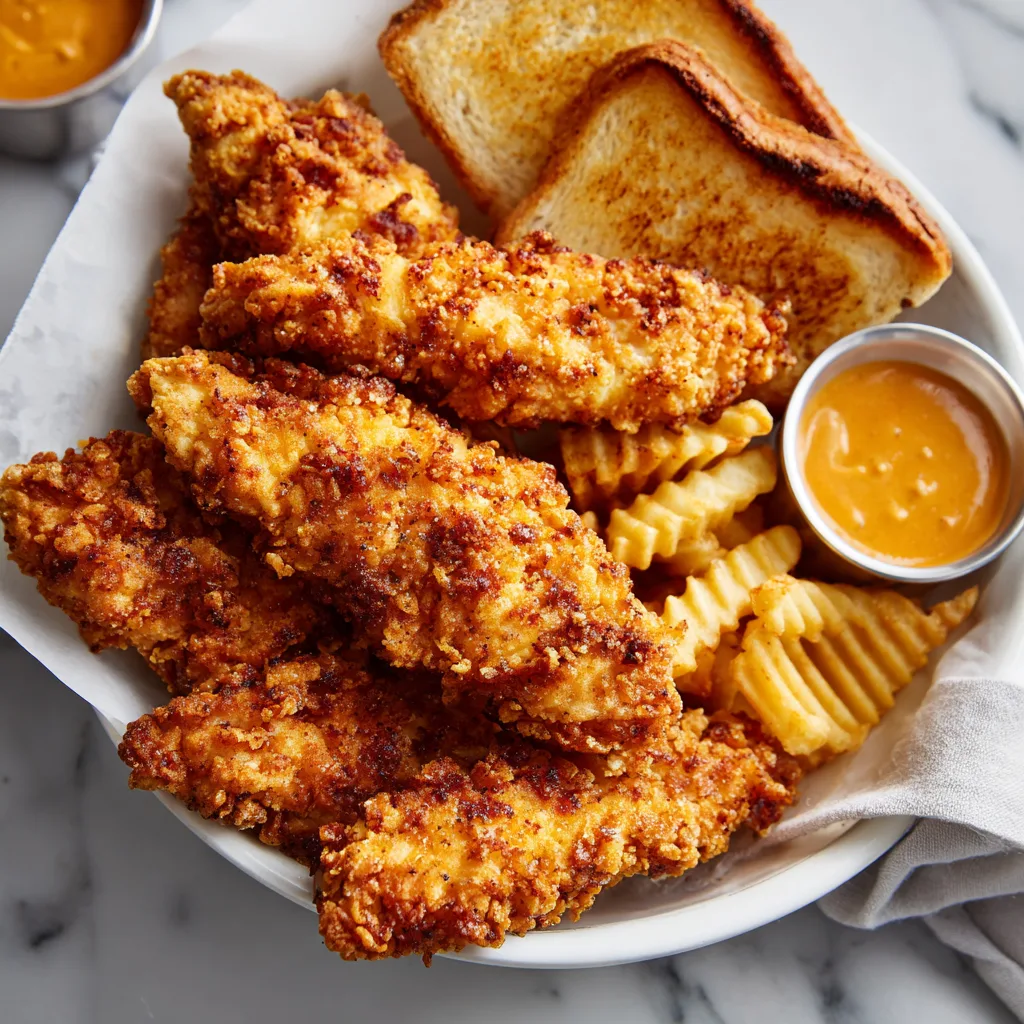
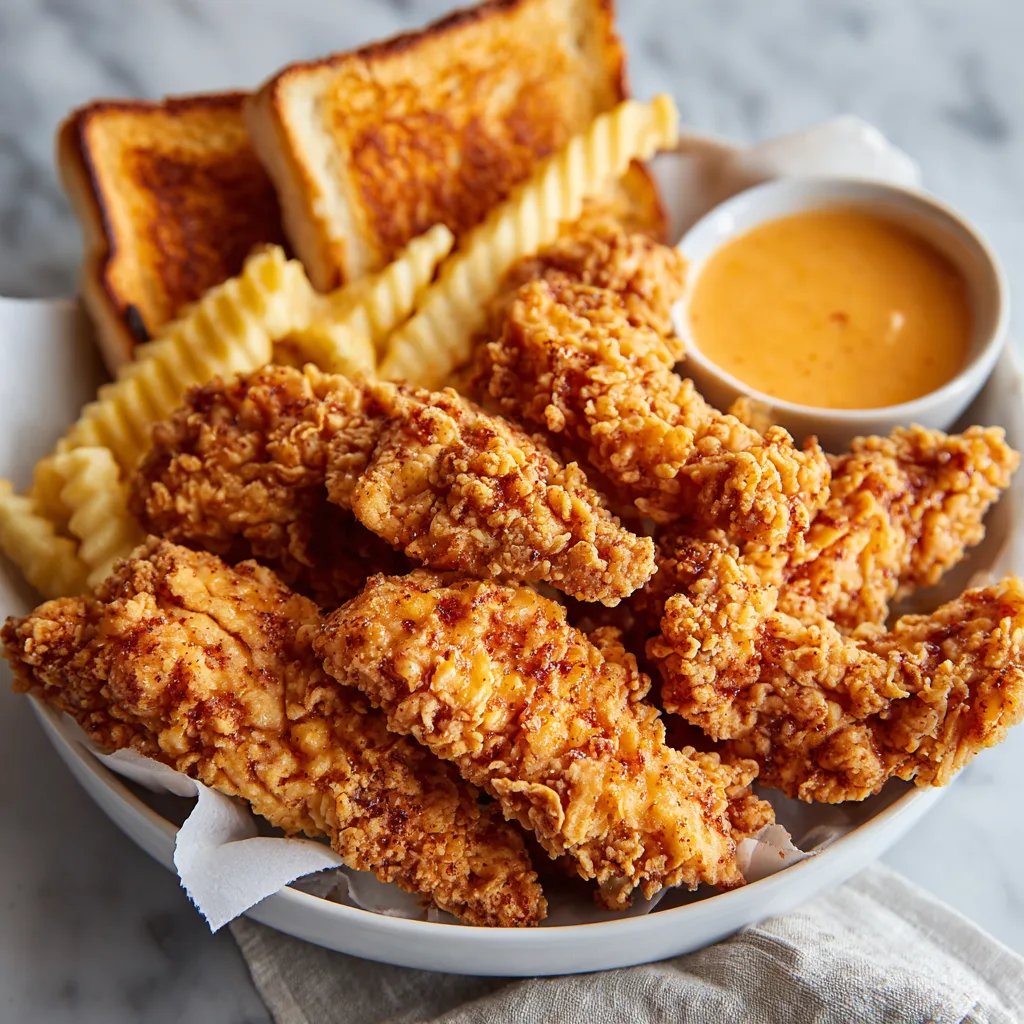
8. Assemble the Basket Line a basket or plate with deli paper. Pile on the fries, stack the crispy chicken tenders on top, and tuck in a slice of buttery Texas toast. Serve with a ramekin of the cold signature sauce.
Tips for the Perfect Fry
- Oil Management: Use an oil with a high smoke point, like canola, vegetable, or peanut oil. Olive oil burns at too low of a temperature for deep frying.
- The “Wet Hand/Dry Hand” Method: When breading, use one hand to take the chicken out of the wet milk and drop it in the flour. Use the other “dry” hand to toss flour over it and press it down. This prevents your fingers from becoming a battered, deep-fried mess.
- Keeping it Crispy: If you are cooking for a crowd, the wire rack in a low oven (200°F) is essential. It keeps the air circulating around the chicken so the crust stays crisp while the inside stays hot.
Variations to Try
Nashville Hot Style: Want some heat? Whisk together ½ cup of the hot frying oil with 2 tablespoons of cayenne pepper, 1 teaspoon of brown sugar, and ½ teaspoon of paprika. Brush this spicy oil over the fried tenders right before serving.
The “Light” Version (Air Fryer): Preheat your air fryer to 400°F. Spray the breaded tenders generously with cooking spray (this is crucial to avoid white flour spots). Cook for 10-12 minutes, flipping halfway and spraying again, until golden and 165°F internal.
Gluten-Free: Substitute the All-Purpose flour with a high-quality 1:1 Gluten-Free flour blend. Ensure your cornstarch and baking powder are certified gluten-free as well.
Crispy Buttermilk Chicken Tenders Basket
Restaurant-style crispy chicken tenders marinated in buttermilk, served with crinkle fries, Texas toast, and a signature tangy dipping sauce.
Ingredients
Equipment
Method
- Whisk buttermilk, egg, garlic powder, and salt in a bowl. Add chicken and marinate in fridge for at least 1 hour.
- Mix sauce ingredients (mayo, ketchup, Worcestershire, spices) in a small bowl and refrigerate.
- In a shallow dish, combine flour, cornstarch, baking powder, and dry spices.
- Drizzle 2 tbsp of marinade into the flour mixture and mix with a fork to create craggy lumps.
- Heat oil in a Dutch oven to 350°F (175°C).
- Dredge chicken in flour mixture, pressing firmly to adhere. Shake off excess.
- Fry chicken in batches for 5-6 minutes until golden brown and 165°F internal temperature. Drain on a wire rack.
- Prepare fries according to package. Butter and toast bread in a skillet until golden.
- Serve tenders hot with sauce, fries, and toast.
Notes
Ensure oil returns to temperature between batches to prevent greasy chicken.
Cultural Context: The Rise of the Chicken Finger
While fried chicken has deep roots in the American South, the “chicken tender” as a specific dish is a relatively modern invention, gaining massive popularity in the 1970s and 80s. Before then, chicken was almost always fried on the bone. The tenderloin (the strip of meat attached to the underside of the breast) is the most tender part of the bird, hence the name.
Today, the combination of tenders, toast, and crinkle fries has become a cult classic, with restaurants dedicated solely to this one meal. But as with most things, making it at home allows you to control the quality of the ingredients and customize the seasoning to your exact preference.
Enjoy this basket of golden, crunchy happiness. It requires a little effort to set up the frying station, but one bite of that homemade crust dipped in the tangy sauce, and you will never look at drive-thru chicken the same way again.