Follow Me On Social Media!
Better Than the Original: The Ultimate Homemade Chocolate Peanut Butter Eggs
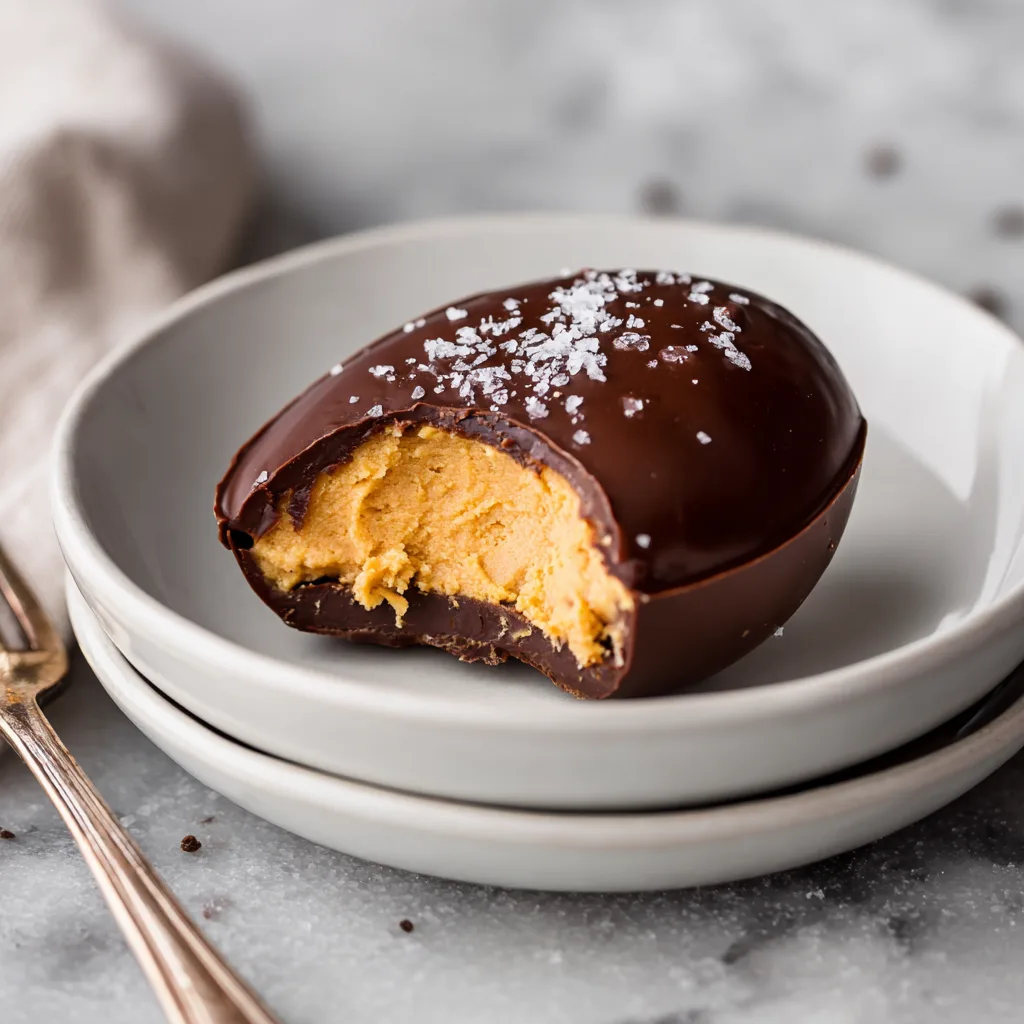
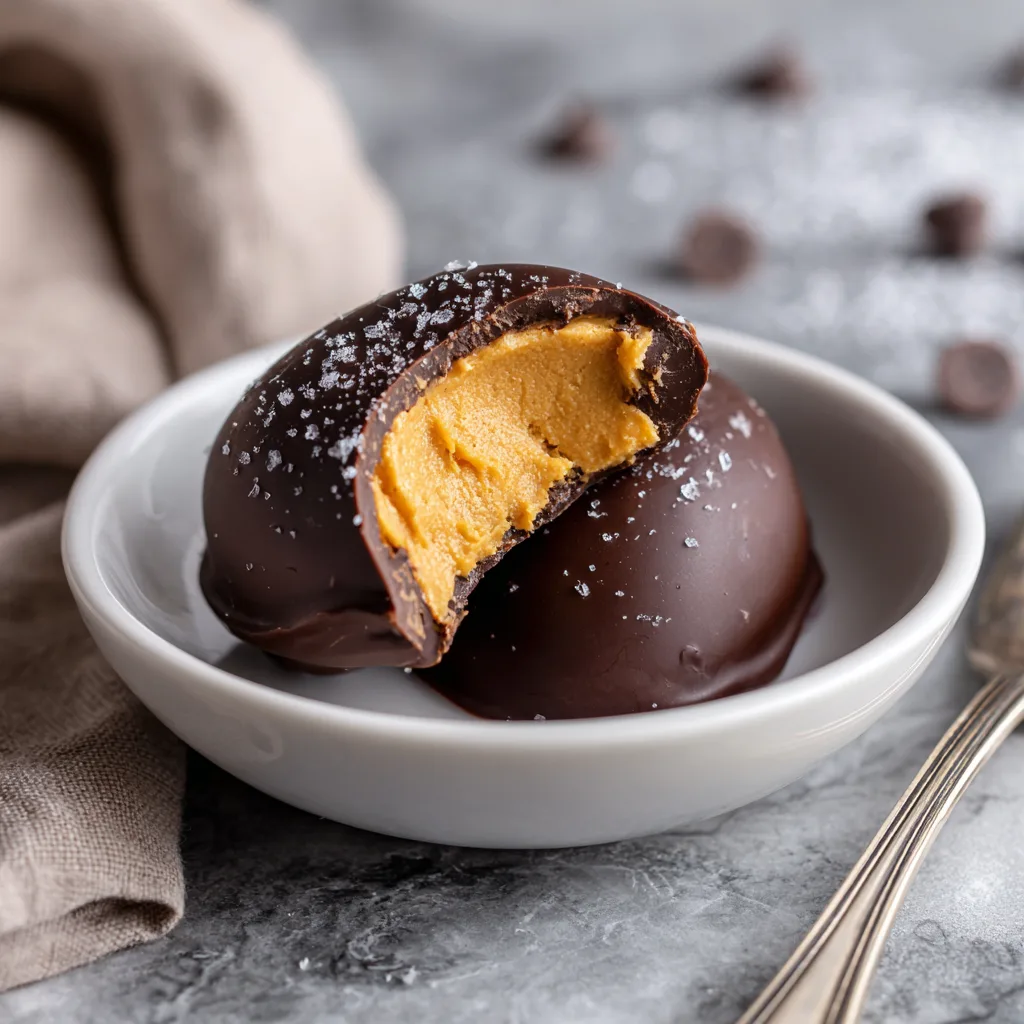
There is a specific kind of magic that happens when creamy peanut butter meets rich chocolate. It is a flavor combination that has stood the test of time, defined childhoods, and dominated holiday candy aisles for decades. But if you have been relying on store-bought candy eggs to get your fix every spring, you are missing out on a culinary revelation. Homemade Chocolate Peanut Butter Eggs are not just a copycat recipe; they are a vast improvement on the original. They are fresher, creamier, and free from the preservatives and stabilizers that keep the packaged versions on the shelf for months.
At Nutri Flavor Guide, we believe that treating yourself shouldn’t mean compromising on quality. Making candy at home allows you to control the ingredients, adjust the sweetness, and customize the chocolate coating to your exact preference. Whether you are a die-hard dark chocolate fan or a milk chocolate purist, this recipe is the blank canvas for your perfect Easter treat.
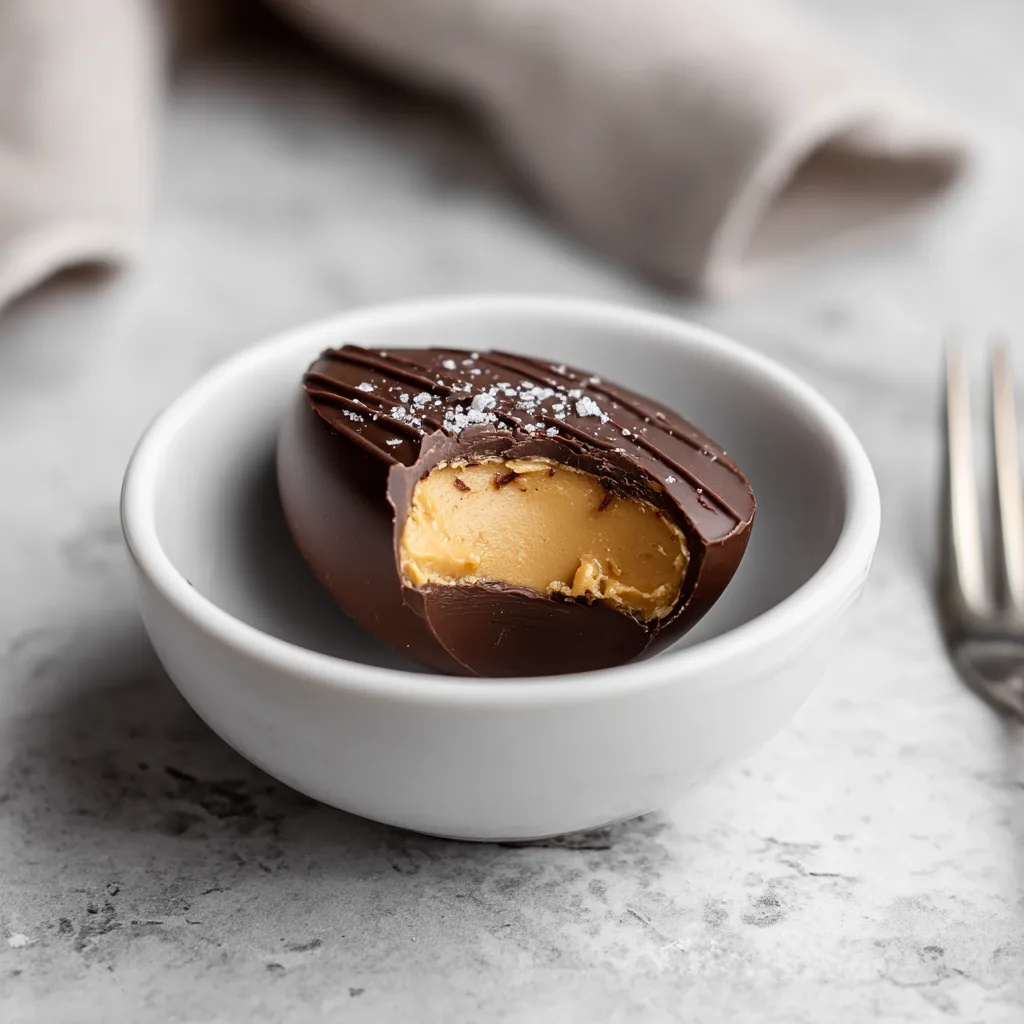
The beauty of this recipe lies in its simplicity. It requires no baking, no candy thermometers, and no complex tempering skills. It is a humble assembly of pantry staples that transforms into a confectionery masterpiece. The filling is a play on a peanut butter truffle—soft, sweetened just enough to balance the saltiness of the nuts, and stabilized with a touch of butter to give it that melt-in-your-mouth texture. The coating is a snappy chocolate shell that provides the perfect textural contrast to the soft center.
This guide will walk you through every step of the process, from mixing the perfect dough to achieving a smooth, professional-looking dip. We will explore the science behind why certain peanut butters work better than others, how to fix a seizing chocolate mixture, and the secrets to storing these treats so they taste just as good weeks later.
The Ingredients: A Deep Dive
To create the perfect peanut butter egg, you need to understand your building blocks. Here is what you will need:
- Creamy Peanut Butter – This is the star of the show. We recommend using a standard commercial creamy peanut butter (like Jif or Skippy) rather than a natural style. Natural peanut butters tend to separate and can make the dough too oily or gritty. The stabilizers in commercial brands help the egg hold its shape perfectly at room temperature.
- Unsalted Butter – Butter adds richness and structure to the filling. Using unsalted allows you to control the sodium level, which is crucial since peanut butter is already salty. Make sure your butter is fully softened to room temperature so it incorporates smoothly without lumps.
- Powdered Sugar (Confectioners’ Sugar) – This sweetens the filling and acts as a thickener. Unlike granulated sugar, powdered sugar dissolves instantly into the fats, ensuring a silky smooth texture without any grit.
- Vanilla Extract – A splash of high-quality vanilla extract rounds out the flavors, adding a floral warmth that bridges the gap between the savory peanuts and the sweet sugar.
- Semi-Sweet or Milk Chocolate Chips – The choice of chocolate is personal. Semi-sweet chocolate (around 60% cocoa) provides a sophisticated, slightly bitter contrast to the sweet filling. Milk chocolate mimics the classic candy bar taste. High-quality chips or couverture chocolate will melt better and offer a superior snap.
- Coconut Oil or Shortening – This is the secret weapon for the coating. Adding a small amount of fat to the melting chocolate makes it more fluid, easier to dip, and creates a shinier finish once set. It also prevents the chocolate from cracking too easily when you bite into it.
Step-by-Step Instructions: Mastering the Method
1. Create the Peanut Butter Dough The process begins with the filling. You aren’t just mixing ingredients; you are creating an emulsion of fats and sugars. Start by creaming the softened butter and peanut butter together until they are completely uniform. This ensures that every bite has the same texture. Gradually add the powdered sugar. If you dump it all in at once, you might end up with a powdery mess. Add it in cups, mixing on low speed. The mixture will go from sticky to crumbly, and finally to a playdough-like consistency. It should be firm enough to handle but soft enough to shape. If it’s too sticky, add a tablespoon more sugar; too dry, add a teaspoon of milk.
2. Shaping the Eggs This is the fun part, and a great step to get kids involved in. Scoop about a tablespoon of the dough and roll it into a ball between your palms. To get the classic egg shape, slightly flatten the ball and pinch one end to taper it. It doesn’t have to be geometrically perfect; the imperfections are the hallmark of a handmade treat. Place your shaped eggs on a baking sheet lined with parchment paper. The parchment is essential—it prevents sticking and makes cleanup a breeze.
3. The Crucial Freeze Do not skip this step! The peanut butter eggs must be frozen for at least 30 minutes before dipping. Why? Because warm peanut butter dough is soft and pliable. If you try to dip a room-temperature egg into hot melted chocolate, it will fall apart or lose its shape, leaving you with a messy lump. The cold egg also helps the chocolate set faster, preventing it from pooling too much at the bottom.
4. Melting the Chocolate The microwave method is the easiest way to melt chocolate, but it requires patience. Place your chocolate chips and coconut oil in a microwave-safe bowl. Heat in 30-second intervals, stirring vigorously in between. It is easy to scorch chocolate, which makes it grainy and unusable. By stirring often, you use the residual heat of the bowl to melt the chips gently. Alternatively, you can use a double boiler on the stovetop for more control.
5. The Dip and Drizzle Remove only a few eggs from the freezer at a time. Using a fork, lower an egg into the chocolate. Flip it to coat, then lift it out. Tap the fork gently against the side of the bowl to shake off excess chocolate—this ensures a thin, crisp shell rather than a thick, gummy one. Slide the egg back onto the parchment paper. For that professional finish, take a little leftover melted chocolate and use a fork or a piping bag to drizzle lines over the tops of the set eggs.
Tips for Success
- Temperature Control: If your kitchen is very warm, the dough might become difficult to work with. If this happens, pop the bowl in the fridge for 10 minutes to firm up the fats.
- Thinning the Chocolate: If your chocolate seems too thick even after melting, add another half-teaspoon of coconut oil. The consistency should be like heavy cream.
- Clean Edges: Once the chocolate has fully set, you might notice “feet”—little pools of chocolate at the base of the egg. You can trim these off with a small paring knife for a cleaner look.
Creative Variations
At Nutri Flavor Guide, we love to experiment. Once you have mastered the base recipe, try these twists:
- Crunchy Eggs: Swap the creamy peanut butter for crunchy, or mix in half a cup of Rice Krispies cereal for a delightful texture.
- Cookie Dough Core: Mix in crushed graham crackers to the peanut butter filling to mimic the texture of a peanut butter pie crust.
- Salted Caramel: Sprinkle flaky sea salt on top of the wet chocolate immediately after dipping. The salt cuts through the sweetness and elevates the flavor profile.
- White Chocolate Raspberry: Use white chocolate for the coating and freeze-dried raspberry powder dusted on top for a fruity, elegant version.
Storage and Shelf Life
One of the best things about these eggs is how well they keep. Because there are no eggs or highly perishable ingredients in the filling (the butter is stabilized by the sugar), they last quite a while.
- Refrigerator: Store in an airtight container for up to 3 weeks. The cold keeps the chocolate snappy.
- Freezer: These freeze beautifully. Place them in a freezer bag or container with parchment paper between layers. They will last for up to 3 months. You can eat them straight from the freezer for a firm, cold treat, or let them thaw for 10 minutes.
Homemade Chocolate Peanut Butter Eggs
Better-than-store-bought peanut butter eggs featuring a creamy, sweet peanut butter center coated in a snappy chocolate shell. A perfect no-bake treat for Easter.
Ingredients
Equipment
Method
- Line a baking sheet with parchment paper and set aside.
- In a medium mixing bowl, beat the softened butter and peanut butter together until creamy and smooth.
- Add the vanilla extract and powdered sugar. Mix until the dough comes together. It should look like playdough.nIf the mixture is too crumbly, add milk one teaspoon at a time until it holds together.
- Scoop about 1 tablespoon of dough and roll into a ball. Flatten slightly and pinch one end to create an egg shape.nPlace onto the prepared baking sheet.
- Freeze the formed eggs for at least 30 minutes. This is crucial for dipping.
- Place chocolate chips and coconut oil in a microwave-safe bowl.nMicrowave in 30-second intervals, stirring in between, until completely smooth.
- Remove eggs from freezer. Using a fork, dip each egg into the chocolate, turning to coat.nTap the fork on the side of the bowl to remove excess chocolate.
- Return the coated eggs to the parchment paper. Drizzle with remaining chocolate for decoration if desired.nRefrigerate for 10 minutes to set before serving.
Notes
Store in the refrigerator for up to 3 weeks.
Conclusion
Homemade Chocolate Peanut Butter Eggs are more than just a sweet snack; they are a gesture of care. They show that you took the time to create something special rather than grabbing a bag off a shelf. They are rich, indulgent, and undeniably delicious. Whether you are filling Easter baskets, bringing a dessert to a potluck, or just keeping a stash in your fridge for late-night cravings, this recipe is guaranteed to become a new tradition in your household. So grab your mixing bowl, clear some space in the freezer, and get ready to make the best candy eggs you have ever tasted.