Follow Me On Social Media!
No-Bake Grinch Cheesecake
A festive No-Bake Grinch Cheesecake with a chocolate cookie crust and pale-green cream cheese filling. Easy no-bake holiday dessert with tips for flavoring, decorating, and make-ahead preparation.

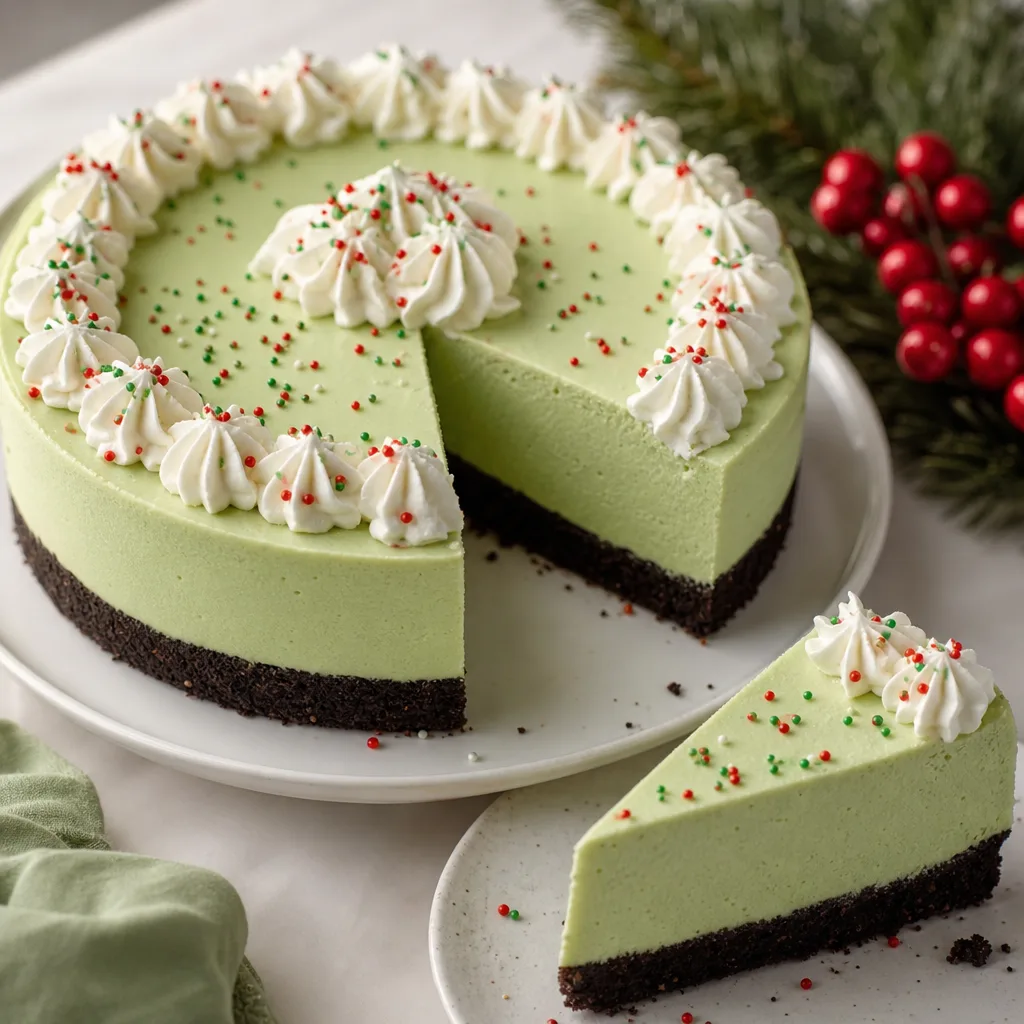
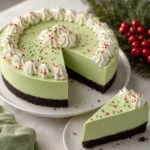
Bright, playful, and impossibly creamy, this No-Bake Grinch Cheesecake is a seasonal crowd-pleaser that skips the oven but delivers full holiday drama. A chocolatey cookie crumb base supports a luxuriously smooth pale-green cheesecake filling, finished with piped white whipped cream and festive red-and-green sprinkles. It’s designed to be made ahead, travel well for holiday parties, and delight kids and adults alike with its cheerful color and classic cheesecake texture.
This recipe emphasizes simple, reliable techniques: an even pressed crust that holds together, a stabilized no-bake filling that slices cleanly, and a whipped topping you can pipe for a polished finish. I include options for flavoring the green filling (natural or colored), stabilization tips so the cake won’t weep, and make-ahead instructions for parties. The goal is a foolproof dessert that looks special without complex steps.
Whether you want a centerpiece for a Christmas dessert table, a fun baking activity with children, or a last-minute festive dessert, this cheesecake offers flexible timing and straightforward assembly. The bright color is intentionally playful; you can choose natural flavors like pistachio or lime, or use classic vanilla with food coloring—each approach changes the flavor profile but not the celebratory effect.
Read on for the full ingredients, step-by-step instructions, troubleshooting advice, and several ways to adapt the cake to different tastes and holiday themes. I provide serving ideas, storage guidance, and answers to frequently asked questions so you can make this dessert with confidence and creativity.
Why this recipe works
This no-bake cheesecake balances density and lightness by combining full-fat cream cheese with whipped cream. The cream cheese provides structure and tang, while whipped cream introduces airiness so the finished dessert feels decadent rather than heavy. The small amount of gelatin adds enough hold to produce clean slices without turning the filling rubbery.
A chocolate cookie crumb crust complements the bright green filling with a bitter-sweet contrast and a crunchy base. Pressing the crumbs firmly into the pan creates a compact layer that supports the filling and prevents crumbling when sliced. The combination of textures — crisp crust, smooth filling, and light piped topping — creates a satisfying mouthfeel that feels special for holiday celebrations.
Ingredient notes and substitutions
Cream cheese: use full-fat cream cheese for the best texture and flavor. Low-fat or Neufchâtel can be used, but expect a looser filling and less rich taste. If using blocks, avoid whipped or spreadable cream cheese in tubs as it contains added stabilizers and air.
Cookies for crust: chocolate sandwich cookies provide deep chocolate flavor and an easy no-bake crust. If you prefer a less-sweet crust, substitute with a mixture of chocolate graham crackers or combine half cookies and half plain graham crumbs. For a gluten-free version, use certified gluten-free chocolate cookies.
Gelatin alternatives: agar-agar can be used for a vegetarian set; follow package directions carefully and be aware that agar sets firmer and can be slightly brittle. Instant powdered gelatin or pectin-based stabilizers may also be used depending on availability.
Ingredients
- Chocolate sandwich cookies (e.g., Oreos) – 300 g / about 30 cookies
- Unsalted butter, melted – 6 tablespoons (85 g)
- Cream cheese, full-fat, room temperature – 24 ounces (680 g)
- Powdered sugar (confectioners') – 3/4 to 1 cup (90–120 g), sifted
- Heavy cream (whipping cream) – 1 1/2 cups (360 ml)
- Granulated sugar – 2 tablespoons
- Unflavored gelatin – 1 tablespoon (about 9 g)
- Cold water (for blooming gelatin) – 3 tablespoons (45 ml)
- Pure vanilla extract – 1 1/2 teaspoons
- Lemon juice – 1 tablespoon
- Green food coloring (gel or paste) – 1/2 to 1 teaspoon, or to taste (optional)
- Pistachio paste or finely ground pistachios – 2 to 3 tablespoons (optional, as flavoring alternative)
- Salt – 1/4 teaspoon
- Whipped cream for piping (stabilized) – from 1 cup heavy cream plus 1 tablespoon powdered sugar and 1 teaspoon vanilla, or use prepared stabilized whipped topping
- Powdered or granulated red and green sprinkles – 2 tablespoons (for decoration)
- Additional melted chocolate or cocoa powder (optional garnish) – to taste
- Nonstick cooking spray or extra butter (for pan) – to taste
Instructions
- Prepare a 9-inch (23 cm) springform pan by lightly greasing the bottom and sides with nonstick spray or butter, then line the bottom with a circle of parchment paper and set aside.
- Make the cookie crust: pulse chocolate sandwich cookies in a food processor until very fine crumbs form. Measure out 300 g (about 30 cookies) of crumbs and transfer to a bowl. Add the melted unsalted butter and 1/8 teaspoon of salt; stir until the mixture resembles wet sand and holds together when pressed. Press the crumbs into the bottom and about 1/2 inch up the sides of the prepared pan, using the bottom of a measuring cup to compact the crust firmly and evenly. Chill in the refrigerator while preparing the filling.
- Bloom the gelatin: sprinkle the unflavored gelatin over 3 tablespoons of cold water in a small bowl and let sit for 5 minutes until spongy. Gently warm the bloomed gelatin in the microwave for 8–12 seconds or over a small pot of simmering water just until it liquefies. Do not boil. Set aside to cool slightly but remain pourable.
- Whip part of the cream for the filling: pour 1 cup (240 ml) heavy cream and 2 tablespoons granulated sugar into a chilled mixing bowl. Whip on medium-high speed until soft peaks form. Stop the mixer when the cream holds a soft peak to fold into the cream cheese mixture later. Transfer the whipped cream to a separate bowl and chill briefly.
- Prepare the cream cheese base: place the room-temperature cream cheese into a large mixing bowl and beat on medium speed until smooth and free of lumps, about 2–3 minutes. Add the sifted powdered sugar (start with 3/4 cup, then taste and adjust up to 1 cup if you like it sweeter), the lemon juice, 1/2 teaspoon vanilla extract, and 1/4 teaspoon salt. Beat until fully combined and silky.
- Add flavoring and color: if using pistachio paste or ground pistachios, fold 2–3 tablespoons into the cream cheese now. If using plain or vanilla cheesecake with coloring, add the green food coloring a little at a time until you reach the desired pale-green hue; gel or paste color gives stronger saturation with less liquid. Taste and adjust flavoring and sweetness before adding gelatin.
- Temper and incorporate the gelatin: slowly drizzle the liquefied gelatin into the cream cheese mixture while beating on low speed, ensuring it disperses evenly. Mix just until combined. If the gelatin has cooled too much and starts to set, rewarm briefly until fluid but avoid overheating.
- Fold in whipped cream: gently fold the whipped 1 cup heavy cream into the cream cheese mixture in three additions, using a rubber spatula and a light touch to preserve as much air as possible. The filling should become smoother and slightly lighter but still dense enough to hold shape.
- Assemble and chill the cheesecake: remove the chilled crust from the refrigerator and pour the green filling onto the cookie base. Smooth the top with an offset spatula. Tap the pan gently on the counter to release any air bubbles and level the surface. Cover the pan loosely with plastic wrap and chill in the refrigerator for at least 6 hours, preferably overnight, until firm to the touch.
- Make the stabilized piping cream (if piping fresh): for the white piped decoration, pour 1 cup (240 ml) heavy cream into a cold bowl with 1 tablespoon powdered sugar and 1 teaspoon vanilla. Whip to medium-stiff peaks. For extra stability, fold in 1–2 teaspoons of the previously bloomed gelatin (cooled and still liquid) or use 1 teaspoon unflavored instant gelatin dissolved per package directions. Transfer to a piping bag fitted with a large star tip.
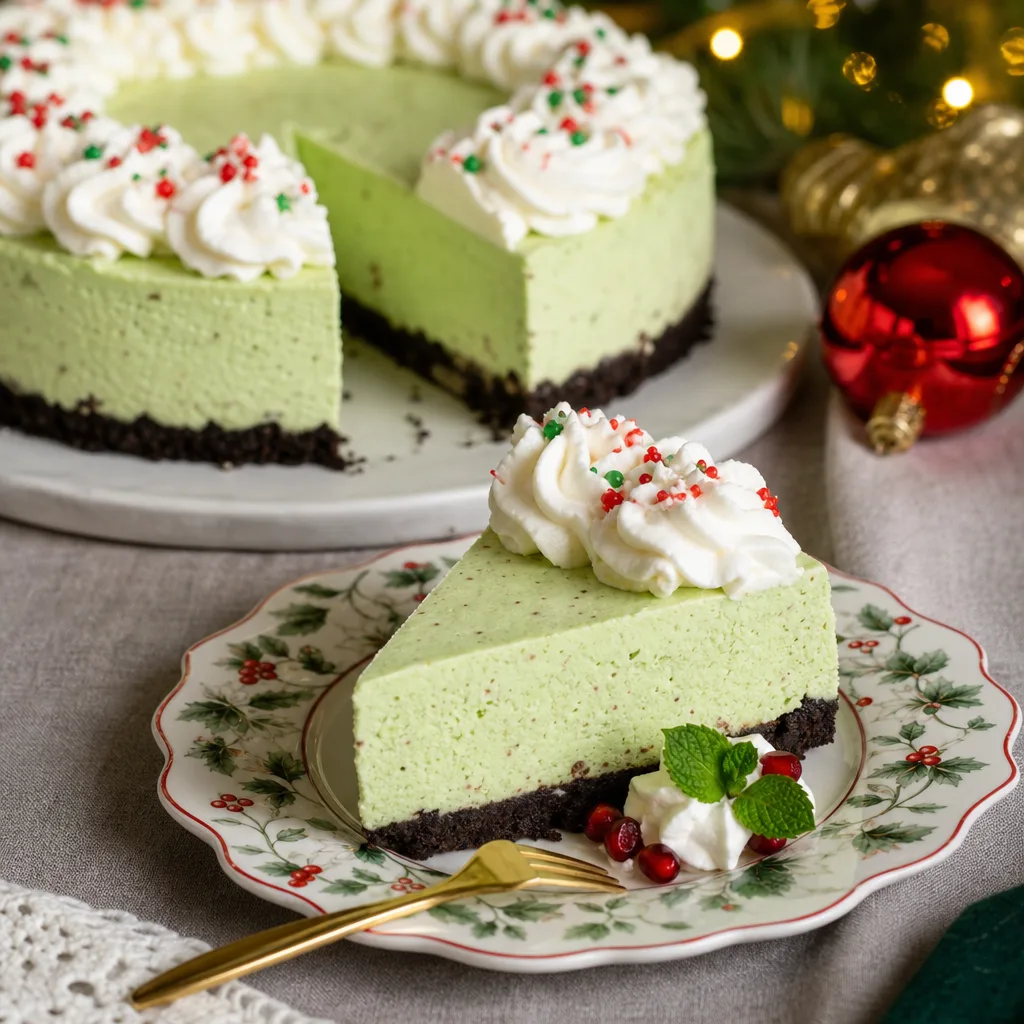
- Decorate: release the chilled cheesecake from the springform pan and transfer to a serving plate. Pipe a ring of white whipped cream around the edge and a central dollop, or create any festive pattern you prefer. Sprinkle red and green sprinkles lightly across the top. Add a dusting of cocoa powder or small drizzles of melted chocolate if desired.
- Slice and serve: chill until just before serving. For clean slices, dip a sharp knife in hot water, wipe dry, then slice. Repeat dipping the knife between cuts. Serve chilled. Store leftovers covered in the refrigerator for up to 4 days.
- Optional finish: for a firmer, no-bleed topping, glaze the piped whipped cream with a thin layer of clear neutral glaze or brush with a light coating of simple syrup before sprinkling decorations to lock them in place.
Pro Tips
- Room-temperature cream cheese is essential for a lump-free filling; take it out at least an hour ahead of time.
- Use gel or paste food coloring for the brightest green without adding extra liquid that could loosen the filling.
- If you don’t have a food processor, place cookies in a heavy-duty zip-top bag and crush with a rolling pin until very fine.
- Chill the mixing bowl and whip cream in a cold bowl to speed whipping and keep the cream stable longer.
- Bloom gelatin carefully and avoid boiling it; overheating destroys gelling power and may affect texture.
- Press the crust firmly and evenly — a compact crust prevents crumbling when sliced.
- For precise slices, refrigerate the whole cake until thoroughly set, and run a hot knife down the blade between cuts.
- To make the filling vegan or dairy-free, substitute with cream cheese alternatives and stabilized coconut cream; results will vary.
- If using pistachio paste, taste before adding color — pistachio often adds its own natural green tint so you may need less food coloring.
- Make the cake a day ahead and add sprinkles and piping the same day to keep decorations crisp.
Variations
- Pistachio Grinch Cheesecake: replace 2–3 tablespoons of flavoring with pistachio paste and omit food coloring or use a very small amount to enhance green. Fold in 2 tablespoons finely ground roasted unsalted pistachios for texture.
- Key Lime Grinch Cheesecake: substitute the lemon juice with 2 tablespoons of fresh key lime juice and add 1 teaspoon finely grated lime zest; use a natural green tint sparingly for color, or let the pale lime color show through.
- Mint Chocolate Grinch Cheesecake: add 1/2 teaspoon peppermint extract in place of vanilla and fold in 1/3 cup mini chocolate chips into the filling for a mint-chocolate contrast. Be cautious with mint extract strength.
- Chocolate Swirl Grinch Cheesecake: reserve 1/2 cup of the plain filling and stir in 2 tablespoons melted cooled chocolate. Dollop onto the green filling and swirl lightly with a skewer before chilling for a marbled effect.
Serving Suggestions
- Serve slices with a dollop of extra whipped cream and a scatter of crushed chocolate cookies for added crunch.
- Plate with a small scoop of vanilla bean ice cream and a drizzle of hot fudge for a decadent holiday pairing.
- Present on a festive platter with fresh pomegranate arils and mint leaves for color contrast and a refreshing bite.
- Serve smaller, individual portions in clear cups with layers of cookie crumbs, green filling, piped cream, and sprinkles for party-friendly grab-and-go desserts.
Make-ahead and transport tips
This cheesecake holds up well for travel when chilled thoroughly. If transporting to a party, freeze the assembled cake for 45–60 minutes to firm the filling and reduce the chance of jostling. Place the chilled cake in a sturdy cake carrier with a non-slip mat on the base.
For best presentation, add the piped whipped cream and sprinkles at the last minute if possible. If you must decorate in advance, choose stabilized whipped topping and pack the cake in a cool container away from direct sunlight or heat sources.
Storage and Reheating
Store the cheesecake tightly covered in the refrigerator for up to 4 days. For longer storage, freeze the whole cake (unfrosted or with minimal piping) wrapped tightly in plastic and then foil for up to 1 month; thaw in the refrigerator overnight. After thawing, add fresh piped whipped cream and sprinkles before serving. Do not reheat — this is a chilled, no-bake dessert best served cold.

No-Bake Grinch Cheesecake
A no-bake, pale-green cheesecake on a chocolate cookie crust, finished with piped whipped cream and festive red-and-green sprinkles. Stabilized with a small amount of gelatin for clean slices and made ahead for easy entertaining.
Ingredients
Equipment
Method
- Prepare a 9-inch springform pan by lightly greasing it with nonstick cooking spray or butter and line the bottom with a parchment circle to ensure easy release.
- Make the cookie crust by processing chocolate sandwich cookies into fine crumbs, then mixing with melted butter and a pinch of salt until the texture resembles wet sand; press firmly into the bottom and slightly up the sides of the prepared pan and chill.
- Bloom the gelatin by sprinkling unflavored gelatin over cold water and letting it stand for about 5 minutes, then warm gently until liquefied and set aside to cool somewhat.
- Whip 1 cup of heavy cream with granulated sugar to soft peaks in a chilled bowl; reserve the whipped cream in the refrigerator for folding into the filling.
- Beat room-temperature cream cheese until smooth, then add powdered sugar, lemon juice, vanilla, and salt; mix until silky and free of lumps.
- If using pistachio paste, fold it into the cream cheese now; if using food coloring, add a small amount and adjust until you achieve a pale-green color.
- Temper and incorporate the cooled liquid gelatin into the cream cheese mixture slowly while mixing on low so it disperses evenly without setting instantly.
- Gently fold the whipped cream into the cream cheese mixture in 2–3 additions until combined and smooth, taking care to preserve air for a lighter texture.
- Pour the green filling onto the chilled crust, smooth the top, tap to remove air bubbles, cover loosely, and chill for at least 6 hours or overnight until firmly set.
- Prepare stabilized piping cream by whipping 1 cup heavy cream with 1 tablespoon powdered sugar and 1 teaspoon vanilla to medium-stiff peaks; for extra stability, fold in a teaspoon of previously bloomed gelatin that remains liquid.
- Release the chilled cheesecake from the springform pan, transfer to a serving plate, pipe a ring and central dollop of white whipped cream, and sprinkle red and green sprinkles across the top.
- Slice the cheesecake with a hot, wiped knife for clean cuts and serve chilled; store leftovers covered in the refrigerator for up to 4 days or freeze for longer storage.
Notes
This cheesecake is best made the day before serving to give the filling time to fully set.
Adjust coloring and flavorings to taste; natural ingredients like pistachio will change both color and flavor, while food coloring preserves the original cheesecake taste.
Frequently Asked Questions
Can I make this cheesecake without gelatin?
Yes, you can omit gelatin, but the filling will be softer and less sliceable, especially if your filling contains a high proportion of whipped cream. If you skip gelatin, increase the ratio of cream cheese to whipped cream (use less whipped cream) and chill longer; the texture will be creamier rather than firm. For vegetarian alternatives, use agar-agar following package instructions, but expect a slightly different mouthfeel.
What gives the cheesecake its green color?
The green color can come from gel or paste food coloring for the brightest, most consistent green, or from natural flavorings like pistachio paste, finely ground pistachios, matcha, or a small amount of lime juice and zest. Each option changes the flavor: pistachio adds nuttiness, matcha adds an earthy note, and food coloring preserves a neutral cheesecake flavor.
How long does it take to set properly?
With gelatin, plan for at least 6 hours of refrigeration, though overnight is best for a fully set texture. Without gelatin, chilling overnight is still recommended; the cake will firm via chilling and the cream cheese structure but won’t be as slice-stable as a gelatin-stabilized version.
Can I use store-bought whipped topping instead of piping fresh whipped cream?
Yes. Stabilized store-bought whipped topping works well and holds its shape for longer, especially for decorating in advance. If you prefer fresh whipped cream, stabilize it with a small amount of gelatin or instant vanilla pudding mix to keep it from weeping or collapsing.
How can I prevent the crust from becoming soggy?
Ensure you compact the crust firmly so it binds with the melted butter. Chilling the crust before adding the filling helps it set. If you expect the cheesecake to sit for a long time before serving, consider brushing the crust lightly with melted chocolate and allowing it to set; the chocolate forms a moisture barrier between the filling and crumbs.