Follow Me On Social Media!
Reese’s Oreo Balls
Easy no-bake Reese's Oreo Balls: chocolate sandwich cookies mixed with cream cheese and peanut butter, dipped in milk chocolate and finished with peanut-butter drizzle and chopped cups. Perfect for parties and holiday trays.


Reese's Oreo Balls are an irresistible, bite-size no-bake treat that brings together three of the very best things in dessert: chocolate sandwich cookies, creamy peanut butter, and a glossy chocolate shell. They deliver a satisfying contrast of textures — dense, slightly crumbly cookie interior, smooth peanut-buttery binding, and a crisp, shiny outer coating — with a pop of extra crunch and flavor from chopped peanut-butter-cup pieces and scattered cookie crumbs. They are ideal for parties, holiday cookie plates, bake sales, or whenever you want an easy, crowd-pleasing candy that feels indulgent but comes together quickly.
This recipe keeps the technique simple and flexible: crush chocolate sandwich cookies into fine crumbs, fold them with cream cheese and peanut butter until a cohesive, scoopable mixture forms, chill, roll into uniform balls, and dip in melted milk chocolate. The finishing touches — a peanut-butter-colored drizzle, a dusting of crushed cookie crumbs, and tiny chopped peanut-butter cups — make them look professional while keeping everything approachable. The method requires no baking, minimal equipment, and can be mostly prepared ahead of time, which makes these perfect for busy hosts and home bakers who want high-impact results with modest effort.
Below you'll find a thorough recipe that covers ingredient notes, step-by-step instructions, helpful tips for smooth and shiny coatings, variations to suit different dietary needs or flavor preferences, serving suggestions, storage guidance, and answers to common questions. Whether you make a single batch for movie night or scale up for a holiday platter, the process is forgiving and adaptable. Read on for everything you need to make beautiful, delicious Reese's Oreo Balls at home.
Why this combination works
Chocolate sandwich cookies, peanut butter, and milk chocolate form a classic trio because their flavors and textures balance and amplify one another. The slightly bitter cocoa notes in the cookie crumbs keep the sweet filling from tasting cloying, while the salt and richness of the peanut butter add savory depth and a creamy mouthfeel. The milk chocolate shell ties the whole bite together and provides a satisfying snap and glossy finish.
Texture plays a major role in the enjoyment of these treats. The crumbly but compacted cookie interior gives a dense foundation, cream cheese contributes a soft, velvet contrast, and the chocolate coating offers a crisp exterior. Tiny toppings like chopped peanut-butter-cup pieces and cookie crumbs introduce small crunchy elements that elevate each bite from merely sweet to multidimensional.
Ingredient notes and substitutions
Cookies: Chocolate sandwich cookies (Oreo-style) are the traditional choice because their creamy centers and crisp chocolate wafers grind down into a flavorful, slightly sweet base. You can use store-brand sandwich cookies or gluten-free versions if needed. If you substitute another chocolate cookie, expect slight changes in sweetness and texture.
Binding agents: Cream cheese gives a soft, luscious texture and a mild tang that balances the sweetness. If you want a dairy-free option, replace cream cheese with a similar weight of firm, refrigerated vegan cream cheese or use additional peanut butter plus powdered sugar. Keep in mind that dairy-free versions can be softer or firmer depending on brand, so adjust powdered sugar as needed.
Troubleshooting common issues
If your chocolate is seizing or grainy, you likely overheated it or introduced moisture. Stop microwaving, add a small amount of warm neutral oil (1 teaspoon), and stir vigorously to smooth it out. If the chocolate remains grainy, discard and start with fresh chocolate to avoid an unpleasant texture.
If peanut-butter drizzle hardens too quickly or looks clumpy, warm it gently and thin with a drop of neutral oil. Use a spoon with a steady hand or a small piping bag for a neater drizzle. Room temperature or slightly chilled coated balls accept drizzle and garnish best because the drizzle adheres without running off.
Ingredients
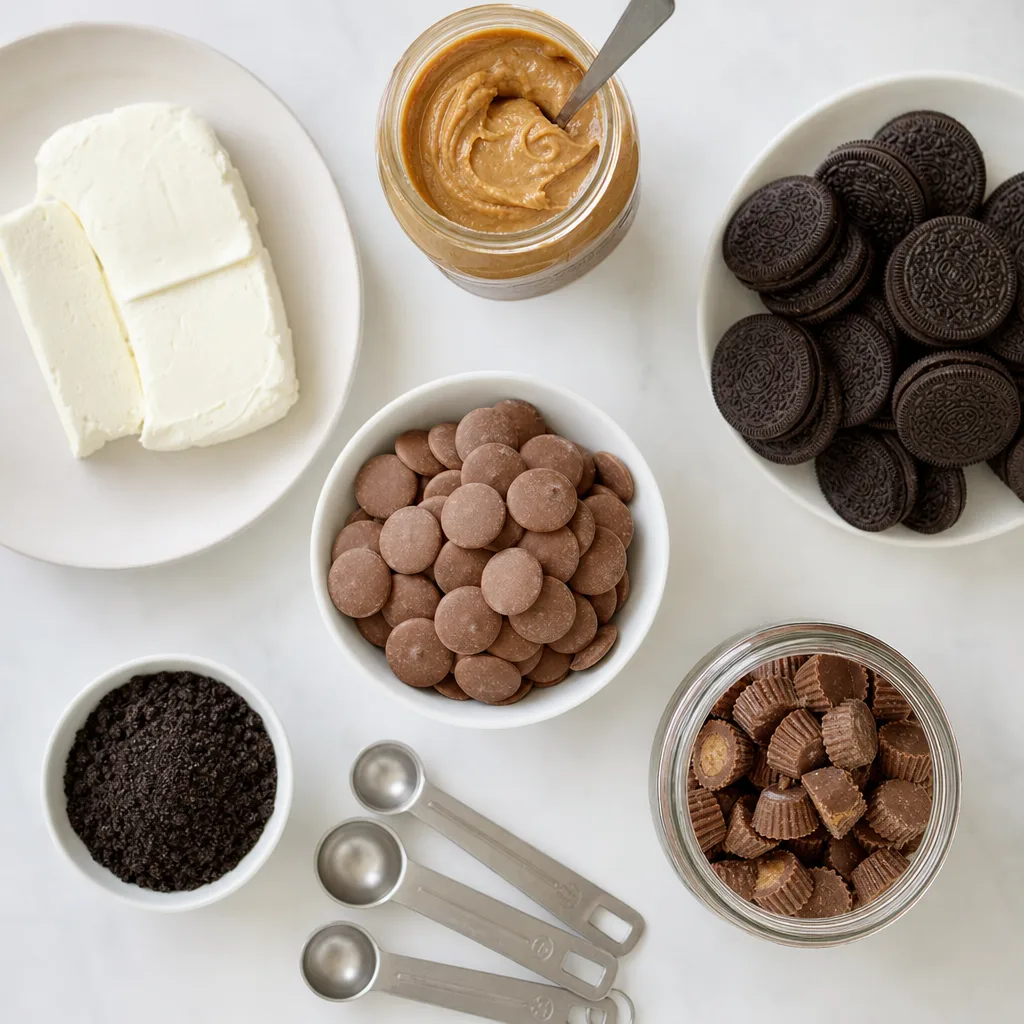
- Chocolate sandwich cookies (Oreo-style), 14–16 oz (about 36–40 cookies)
- Cream cheese, full-fat, 8 oz (room temperature)
- Creamy peanut butter, 1/2 cup (smooth, at room temperature)
- Powdered sugar, 1/4–1/2 cup (optional, for firmer texture)
- Milk chocolate coating or melting wafers, 12–16 oz (for dipping)
- Peanut butter cups (mini or chopped), 1/2 cup (for garnish)
- Peanut butter, 2–3 tablespoons (for drizzle; can be thinned with a little oil)
- Neutral oil, 1–2 teaspoons (optional, to thin melted chocolate)
- Salt, a pinch (optional, to balance sweetness)
- Vanilla extract, 1 teaspoon (optional)
- Crushed chocolate cookie crumbs, 2–3 tablespoons (reserve from cookies for garnish)
- Nonstick spray or parchment paper (not an ingredient but recommended surface)

Instructions
- Prepare your workspace: line a baking sheet with parchment paper or a silicone mat and set a small bowl for the peanut-butter drizzle nearby. Chill a shallow tray or plate in the freezer for 10 minutes to help set the balls quickly. (ingredient_ids: [])
- Crush the cookies: place the chocolate sandwich cookies in a food processor and pulse until they are fine crumbs. If you don't have a food processor, seal cookies in a heavy-duty plastic bag and crush with a rolling pin until fine. Reserve 2–3 tablespoons of the crumbs for garnish. (ingredient_ids: ["ing1"])
- Make the filling: in a large bowl, beat the softened cream cheese with an electric mixer or vigorous whisk until smooth. Add the creamy peanut butter and vanilla extract, then mix until fully incorporated. Add the cookie crumbs and a pinch of salt; stir until a uniform, moist dough forms. If the mixture feels too soft to shape, sprinkle in 1–4 tablespoons powdered sugar, one tablespoon at a time, until it firms up just enough to roll. (ingredient_ids: ["ing2", "ing3", "ing10", "ing11", "ing4"])
- Shape the balls: use a small cookie scoop or tablespoon to portion the mixture, then roll between your palms into 1-inch to 1 1/4-inch round balls. Place each formed ball onto the prepared parchment-lined sheet. If you want perfectly uniform bite-size pieces, weigh each ball (about 18–22 g). Chill the tray of balls in the refrigerator for 20–30 minutes, or until firm. (ingredient_ids: [])
- Melt the coating: chop the milk chocolate or use melting wafers and place them in a microwave-safe bowl. Microwave in 20–30 second bursts, stirring between each, until smooth. If the chocolate is too thick, stir in 1–2 teaspoons neutral oil to achieve a glossy dipping consistency. Keep the chocolate warm and fluid while working. (ingredient_ids: ["ing5", "ing9"])
- Dip the balls: remove chilled balls from the fridge. Using a fork or dipping tool, submerge each ball into the melted chocolate, tapping the fork against the bowl to remove excess coating. Return the coated ball to the parchment-lined sheet. Work quickly so the outer shell sets smooth. If the chocolate begins to thicken, rewarm briefly in 10–15 second bursts. (ingredient_ids: ["ing5"])
- Drizzle and garnish: melt 2–3 tablespoons peanut butter in a small microwave-safe bowl for 10–15 seconds and stir; thin with a tiny bit of neutral oil if needed so it makes a thin drizzle. Use a small spoon or squeeze bottle to drizzle the peanut butter over the coated balls. Immediately sprinkle chopped mini peanut-butter-cup pieces and the reserved crushed cookie crumbs over the top so they adhere to the warm drizzle or chocolate. (ingredient_ids: ["ing6", "ing7"])
- Set and serve: allow the coated balls to set at room temperature for 20–30 minutes, or place in the refrigerator for 10–15 minutes to speed setting. Once firm, transfer to an airtight container and keep chilled until serving. Bring to nearly room temperature before serving for the best flavor and texture. (ingredient_ids: [])
- Optional finishing: for an extra glossy sheen, gently brush any dull spots with a thin sweep of melted chocolate or melt a small additional teaspoon of neutral oil with leftover chocolate and lightly recoat problem areas. (ingredient_ids: ["ing5", "ing9"])
Pro Tips
- Room-temperature cream cheese and peanut butter combine easiest and produce a smoother filling; cold cream cheese creates lumps and makes rolling difficult.
- Reserve a few cookie crumbs before you blend the rest — they make a tidy garnish and give a visual cue that these are Oreo-based treats.
- If your filling is too wet, add powdered sugar a tablespoon at a time until it holds its shape; go slowly to avoid over-sweetening.
- For the shiniest chocolate shell, temper the chocolate or add a teaspoon of neutral oil to melted chocolate to improve gloss and fluidity.
- Work in small batches when dipping so the chocolate remains warm and smooth; rewarm in short bursts rather than overheating.
Variations
- Dark chocolate shell: swap the milk chocolate for dark couverture or dark melting wafers for a deeper, less sweet contrast to the peanut butter.
- Peanut-butter-swirled center: fold 2 tablespoons more peanut butter into the filling for an extra pronounced peanut-butter flavor and a creamier interior.
- Nut-free option: substitute the peanut butter and peanut-butter-cup garnish with sunflower seed butter and chopped chocolate-covered sunflower butter candies to accommodate allergies.
- Spiked adult version: add 1–2 tablespoons of bourbon or dark rum to the filling for an adult-only batch with warm, complex notes.
Serving Suggestions
- Serve on a decorative platter with small paper liners so guests can pick them up easily without sticky fingers.
- Arrange alongside coffee or espresso shots — the chocolate and peanut butter pair beautifully with bright, bitter coffee flavors.
- Include them on a holiday cookie tray mixed with lighter cookies to offer a decadent, chewy bite among other textures.
- Package a few in clear cellophane bags tied with ribbons for easy edible gifts or party favors.
Make-ahead and scaling
These Reese's Oreo Balls are an excellent make-ahead dessert. You can prepare the filling and form the balls up to 48 hours in advance; keep them covered and chilled. Dip in chocolate on the day you plan to serve for the freshest appearance, or dip and store chilled for up to two weeks. For parties, make multiple batches and stagger the dipping so the melted chocolate stays fluid.
Scaling up is straightforward: the cookie-to-cream-cheese-to-peanut-butter ratio is forgiving. When multiplying the recipe, process large quantities of cookies in batches so your food processor doesn’t overheat and divide the filling into work-friendly portions to keep assembly efficient.
Storage and Reheating
Store the Reese's Oreo Balls in an airtight container in the refrigerator for up to 10–14 days. For longer storage, freeze the uncoated or coated balls in a single layer on a baking sheet until solid, then transfer to a freezer-safe container for up to 2 months. Thaw in the refrigerator overnight and bring to cool room temperature before serving. Do not microwave to reheat — this will melt the coating and ruin the texture.
Reese’s Oreo Balls
No-bake bite-size treats made from crushed chocolate sandwich cookies, cream cheese, and peanut butter, dipped in milk chocolate and finished with a peanut-butter drizzle and chopped peanut-butter cups.
Ingredients
Equipment
Method
- Prepare your workspace and chill a tray: line a baking sheet with parchment paper and place another shallow tray or plate in the freezer for 10 minutes to help set the balls quickly.
- Crush the cookies into fine crumbs using a food processor, or place them in a sealed bag and crush with a rolling pin; reserve 2–3 tablespoons of crumbs for garnish.
- Beat the softened cream cheese until smooth, add the creamy peanut butter and vanilla extract, then mix until combined. Add the cookie crumbs and a pinch of salt and stir until an even, moist dough forms. If the mixture is too soft to shape, add powdered sugar one tablespoon at a time until it holds together.
- Portion the filling with a small cookie scoop or tablespoon and roll between your palms into 1- to 1 1/4-inch balls. Place on the parchment-lined sheet and chill for 20–30 minutes or until firm.
- Melt the milk chocolate coating or wafers in short bursts in the microwave, stirring between intervals until smooth. If needed, stir in 1–2 teaspoons neutral oil to achieve a glossy, fluid coating.
- Dip each chilled ball into the melted chocolate using a fork or dipping tool, tapping off excess chocolate, then place back on the parchment-lined sheet. Rewarm the chocolate briefly if it thickens while you work.
- Melt the peanut butter for the drizzle in a small bowl and thin with a tiny amount of neutral oil if necessary. Drizzle over the coated balls, then immediately top with chopped peanut-butter-cup pieces and the reserved cookie crumbs so they adhere.
- Allow the chocolate to set at room temperature for 20–30 minutes or speed the process by refrigerating for 10–15 minutes. Store chilled in an airtight container until serving.
- Optional finish: if any spots look dull or uneven after setting, gently recoat with a thin layer of melted chocolate to achieve an even sheen.
Notes
This recipe is intentionally flexible; adjust powdered sugar and peanut butter to balance texture and flavor.
For best results, use full-fat cream cheese and good-quality chocolate for coating.
Frequently Asked Questions
Can I make these without cream cheese?
Yes. Cream cheese helps achieve a creamy, cohesive texture and balances sweetness. If you prefer not to use cream cheese, you can use an equal weight of additional peanut butter combined with 1/3 to 1/2 cup powdered sugar to bind the crumbs. The texture will be a bit drier and denser without the cream cheese, so work slowly and test one ball for firmness before rolling the rest.
How do I get a perfectly smooth, shiny chocolate coating?
Melt chocolate gently and avoid overheating. Using couverture chocolate and tempering will give the best shine and snap, but adding 1–2 teaspoons of neutral oil (such as refined vegetable or grapeseed oil) to melted chocolate also improves gloss and makes dipping easier. Work quickly, dip in warm, fluid chocolate, and tap off excess before setting on parchment. Allow the chocolate to fully set in a cool, dry place or briefly chill them to firm up.
Can I freeze these, and how does freezing affect texture?
Yes, these freeze well. Lay coated or uncoated balls on a sheet pan and freeze until solid, then store in an airtight freezer container for up to 2 months. Freezing may slightly affect the crispness of the chocolate shell — condensation can form when thawing, so thaw in the refrigerator to minimize moisture. For best texture, bring to cool room temperature before serving rather than allowing them to come to warm room temperature straight from the freezer.
My filling is too sticky to roll. What should I do?
If the filling is sticky, chill it for 10–20 minutes to firm up. If it remains too soft, work in additional powdered sugar, one tablespoon at a time, until it becomes manageable. A small amount of cornstarch (1 teaspoon) can also help absorb moisture without adding too much sweetness, but powdered sugar is the most flavor-friendly option.
Can I use crunchy peanut butter instead of creamy?
You can, but the texture will change: crunchy peanut butter will add small nut fragments to the filling, which some people love for contrast. If you prefer a smooth interior, use creamy peanut butter. If using crunchy, you might want to pulse the cookies a little finer to keep the overall texture balanced.