Follow Me On Social Media!
No Bake Peanut Butter Oat Cups: The Ultimate Easy Chocolate Treat You’ll Make Again and Again
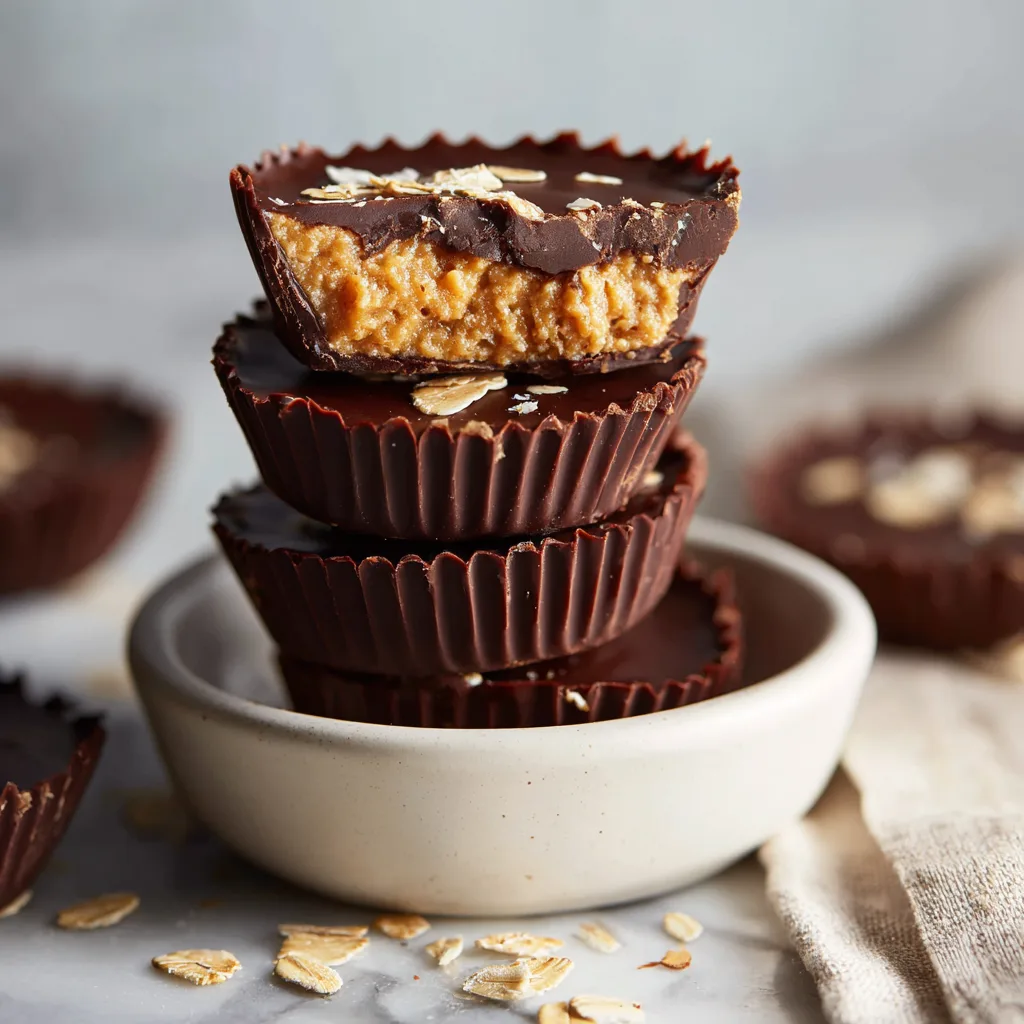
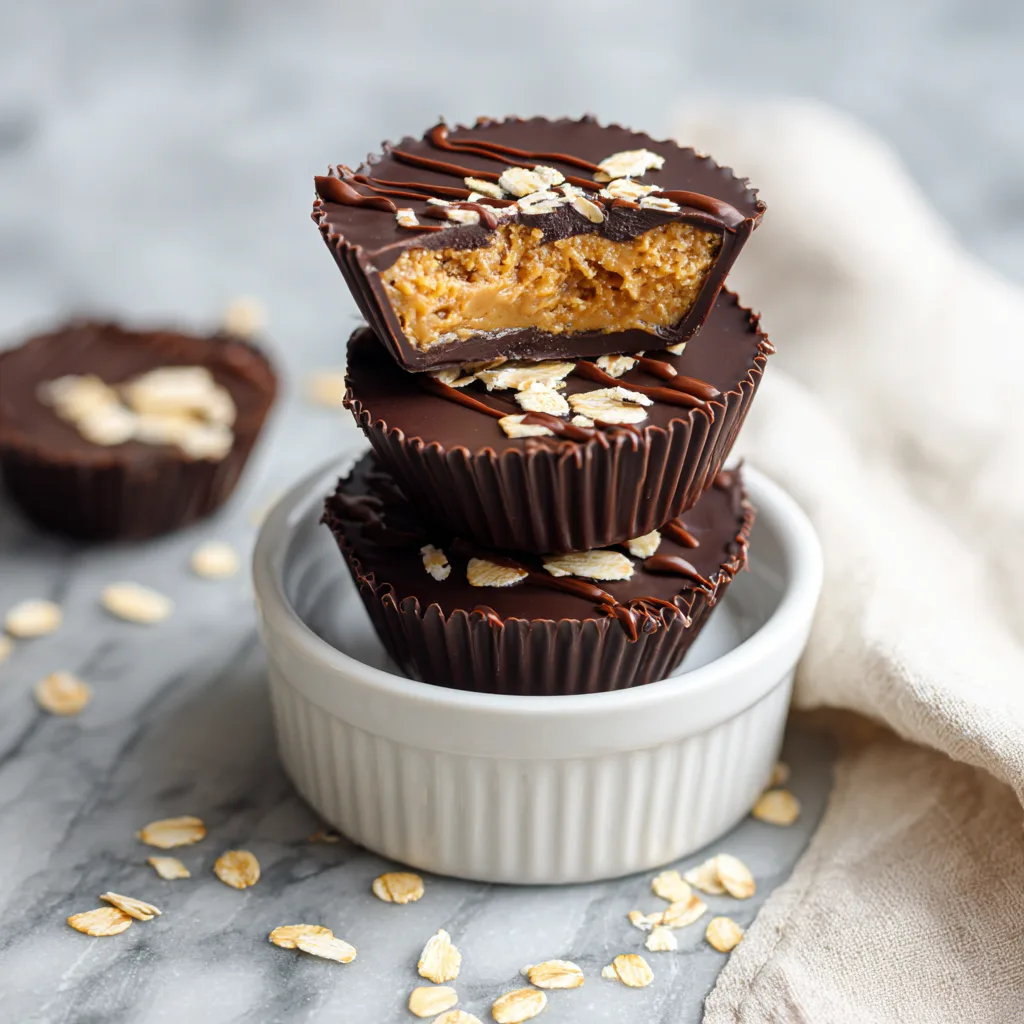
If you’ve ever craved a rich, chocolatey treat but didn’t want to turn on the oven, these No Bake Peanut Butter Oat Cups are exactly what you need. Packed with hearty rolled oats, creamy peanut butter, natural sweetness from honey, and a satisfying dark chocolate shell, these cups come together in under 20 minutes of active prep time and require nothing more than a freezer to set. Whether you’re looking for a healthy no bake snack cup to fuel your afternoon, a make-ahead dessert that wows at parties, or a freezer-friendly treat your whole family will devour, this recipe checks every box.
These no bake chocolate peanut butter cups have become a staple in kitchens everywhere for one simple reason: they taste indulgent without being complicated. There’s something deeply satisfying about biting through a firm dark chocolate shell into a chewy, nutty, golden peanut butter oat center. They’re rich but not overpowering, sweet but not cloying, and — when made with good ingredients — surprisingly nourishing.
Let’s dive into everything you need to know to make the perfect batch.
Why You’ll Love This Recipe
These no bake peanut butter oat cups aren’t just easy — they’re genuinely impressive. Here’s why this recipe stands out:
No oven required. The entire recipe is done on the stovetop (or microwave) and freezer. Perfect for hot days, last-minute guests, or when you simply don’t feel like baking.
Minimal ingredients. You need fewer than 10 pantry staples, most of which you probably already have on hand.
Meal-prep friendly. Make a big batch and store them in the freezer for weeks. They’re ready whenever a craving strikes.
Naturally customizable. Swap honey for maple syrup to make them vegan, use any nut butter you like, and choose your preferred chocolate — dark, semi-sweet, or milk.
Crowd-pleasing. From kids to adults, everyone loves these. They look like something from a fancy chocolatier but take less than half an hour to prepare.
Ingredients
For the Peanut Butter Oat Filling:
- 2 cups rolled oats (old-fashioned, not instant)
- 1 cup creamy peanut butter (natural or conventional, both work)
- 1/3 cup honey (or pure maple syrup for a vegan version)
- 2 tablespoons coconut oil, melted
- 1 teaspoon pure vanilla extract
- 1/4 teaspoon fine sea salt
For the Chocolate Shell:
- 1½ cups dark chocolate chips (or chopped dark chocolate, 60–70% cacao)
- 1 tablespoon coconut oil
Instructions
- Prepare your muffin tin. Line a standard 12-cup muffin tin with paper or silicone cupcake liners. Set aside.
- Make the chocolate base layer. In a microwave-safe bowl, combine the dark chocolate chips and 1 tablespoon of coconut oil. Microwave in 30-second intervals, stirring between each, until completely smooth and glossy. Alternatively, melt over a double boiler on the stovetop over low heat.
- Add the first chocolate layer. Spoon approximately 1 to 1.5 teaspoons of melted chocolate into the bottom of each cupcake liner. Spread it into an even layer covering the bottom completely. Transfer the muffin tin to the freezer for 10 minutes until the chocolate is set and firm.
- Make the peanut butter oat filling. While the chocolate sets, combine the rolled oats, peanut butter, honey, melted coconut oil, vanilla extract, and sea salt in a large mixing bowl. Stir well until every oat is coated and the mixture holds together when pressed. It should feel like a dense, sticky dough — slightly firmer than cookie dough.
- Fill the cups. Remove the muffin tin from the freezer. Scoop a generous tablespoon of the peanut butter oat mixture into each cup on top of the set chocolate layer. Press down firmly with your fingers or the bottom of a glass to compact the filling into an even, flat layer. Leave about 3–4mm of space at the top of each liner for the final chocolate layer.
- Top with chocolate. Spoon the remaining melted chocolate over each cup, spreading it to fully cover the peanut butter oat filling and seal the edges against the liner. Tap the muffin tin gently on the counter a few times to level the chocolate and release any air bubbles.
- Chill until set. Return the muffin tin to the freezer and chill for at least 20–30 minutes, or until the chocolate is completely firm and solid.
- Unmold and serve. Remove the cups from the freezer, peel away the cupcake liners, and enjoy immediately. For best texture, let them sit at room temperature for 2–3 minutes before biting in.
Tips for Perfect No Bake Peanut Butter Oat Cups
Use old-fashioned rolled oats, not quick oats or instant oats. Old-fashioned oats give these cups their characteristic chewy texture and hold their structure better. Quick oats will make the filling mushy and too soft.
Natural peanut butter works great but stir it well first. If your natural peanut butter has separated oil sitting on top, stir it thoroughly before measuring. Oily peanut butter will make the filling too soft, while dry peanut butter will make it crumbly. Aim for a smooth, creamy consistency.
Don’t skip the coconut oil in the chocolate. Adding coconut oil to the melting chocolate creates a smoother, glossier finish and makes the chocolate slightly easier to bite through once frozen — without it, dark chocolate can become almost rock-hard in the freezer.
Press the filling firmly. This is the key step most people rush. The tighter you press the peanut butter oat filling into each cup, the better it will hold together when you unmold and eat it. Take 15 extra seconds per cup — it makes a real difference.
Let them temper before eating. Taking the cups out of the freezer 2–3 minutes before eating allows the chocolate to soften just slightly and the filling to become perfectly chewy rather than frozen-hard.
Variations to Try
Almond Butter Oat Cups: Replace the peanut butter with almond butter for a slightly milder, more delicate flavor. Almond butter pairs beautifully with dark chocolate and gives these cups a slightly more sophisticated edge.
White Chocolate Drizzle: After the dark chocolate top has set, melt a small amount of white chocolate and drizzle it artistically over the tops. It adds visual appeal and a sweet flavor contrast.
Coconut Peanut Butter Cups: Add 1/4 cup of unsweetened shredded coconut to the oat filling for extra texture and a tropical flavor note. The coconut subtly enhances the nuttiness of the peanut butter.
Protein-Packed Version: Stir 2 tablespoons of your favorite vanilla or chocolate protein powder into the filling mixture. This turns each cup into a post-workout treat with an extra protein boost. You may need to add an extra teaspoon of honey to balance the dryness.
Salted Caramel Twist: Add a small pinch of flaky sea salt on top of each cup right after pouring the final chocolate layer, before it sets. The salt amplifies the chocolate flavor and creates a satisfying sweet-salty contrast.
Nut-Free Version: For a school-safe or allergy-friendly version, substitute sunflower seed butter or tahini for the peanut butter. The filling will have a slightly different flavor but the same satisfying texture.
Serving Suggestions
As a frozen treat: Serve them straight from the freezer on warm days. They function like a rich, chocolatey ice cream bite and are especially popular with kids in summer.
At room temperature: Let them sit out for 5–10 minutes for a softer, chewier experience. The chocolate becomes slightly tacky and the filling loosens to an almost-fudgy consistency.
As a party dessert platter: Arrange them in a single layer on a white serving board with a few scattered oats and chocolate chips around them. They look elegant and homemade in the best possible way.
Paired with coffee: One or two cups alongside a strong black coffee or an espresso is a genuinely satisfying afternoon break. The bitterness of dark chocolate plays perfectly with coffee.
As a lunchbox treat: Keep a small container of these in the fridge for lunchbox snacks. At refrigerator temperature, they’re firm enough to transport without melting but soft enough to eat comfortably.
Storage and Make-Ahead Instructions
Refrigerator: Store in an airtight container in the refrigerator for up to 1 week. At refrigerator temperature, the chocolate stays firm and the oat filling remains chewy and fresh.
Freezer: Store in an airtight, freezer-safe container for up to 3 months. Layer them between sheets of parchment paper to prevent sticking. This makes them perfect for batch cooking.
Room temperature: These can sit at room temperature for up to 2 hours without significant softening, making them suitable for parties and gatherings without refrigeration during the event.
Do not microwave to thaw. Simply move them from the freezer to the counter or refrigerator and allow them to thaw naturally.
Nutritional Benefits Worth Knowing
While these cups are absolutely a treat, they’re made with ingredients that offer real nutritional value compared to conventional candy or processed snacks.
Rolled oats are one of the most fiber-rich whole grains available. They contain beta-glucan, a type of soluble fiber associated with supporting healthy cholesterol levels and promoting a feeling of fullness. They also provide steady, sustained energy — no sharp blood sugar spikes.
Peanut butter is a dense source of healthy monounsaturated fats, plant-based protein, and several key micronutrients including magnesium, vitamin E, and potassium. It contributes to satiety and makes these cups genuinely filling.
Dark chocolate (70% cacao or higher) provides antioxidants called flavonoids, which have been associated with cardiovascular benefits. It also contributes a small amount of iron and magnesium, making it one of the more nutritionally meaningful chocolate options.
Honey offers trace enzymes, antioxidants, and a natural sweetness profile. Compared to refined white sugar, it provides marginally more micronutrient diversity, though it should still be used in moderation.
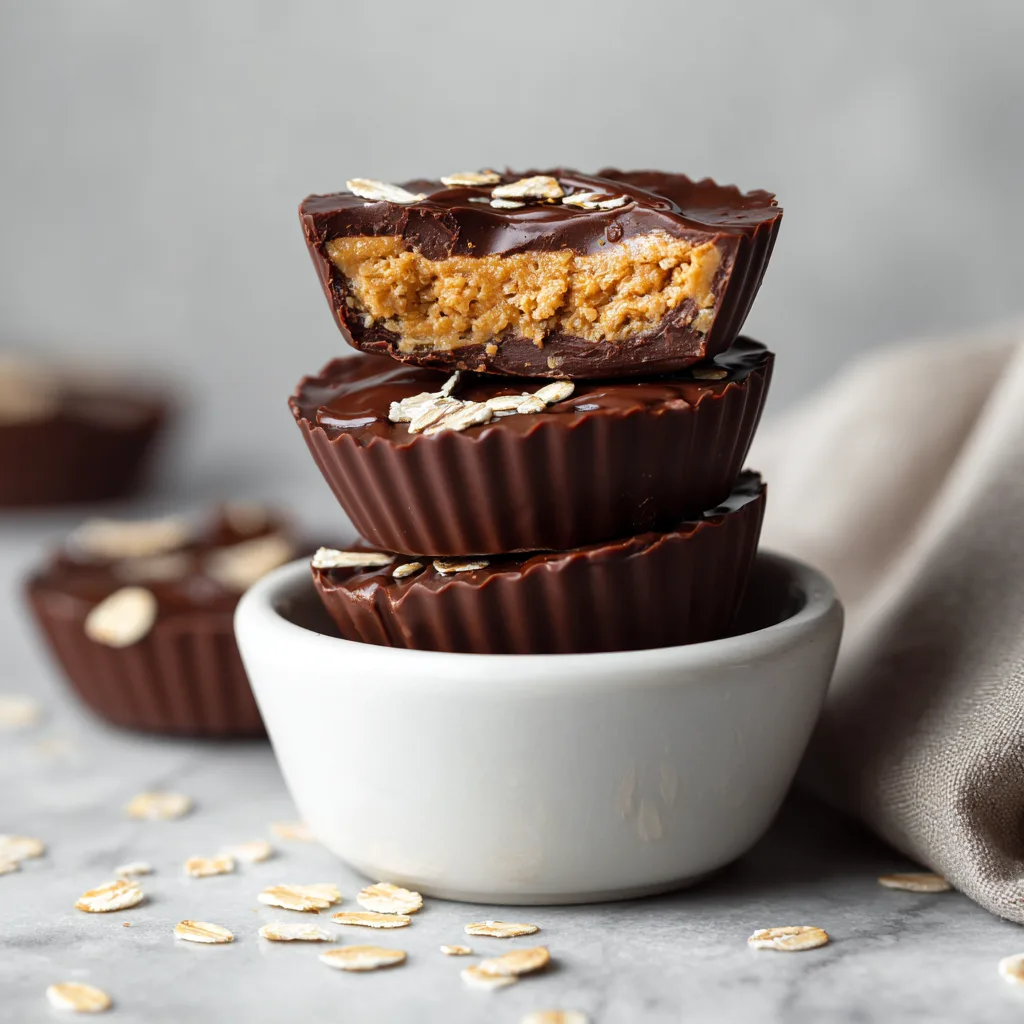
No Bake Peanut Butter Oat Cups
Creamy peanut butter and hearty rolled oats encased in a rich dark chocolate shell — no oven required. These freezer-friendly cups come together in under 20 minutes and are perfect for a quick healthy snack or make-ahead dessert.
Ingredients
Equipment
Method
- Line a standard 12-cup muffin tin with paper or silicone cupcake liners and set aside.
- Melt dark chocolate chips and 1 tbsp coconut oil together in a microwave-safe bowl in 30-second intervals, stirring between each, until completely smooth. Alternatively, use a double boiler over low heat.
- Spoon 1–1.5 teaspoons of melted chocolate into the bottom of each cupcake liner. Spread into an even layer. Freeze for 10 minutes until set.
- In a large mixing bowl, combine rolled oats, peanut butter, honey, melted coconut oil, vanilla extract, and sea salt. Stir until fully combined and the mixture holds together when pressed.
- Remove muffin tin from freezer. Scoop a generous tablespoon of filling into each cup on top of the set chocolate layer. Press down firmly to compact into a flat, even layer.
- Spoon the remaining melted chocolate over each cup to fully cover the filling. Tap the tin on the counter to level the chocolate and remove air bubbles.
- Return to freezer and chill for 20–30 minutes until the chocolate is completely solid.
- Remove from freezer, peel away liners, and let sit 2–3 minutes before serving. Enjoy immediately or store in an airtight container in the freezer for up to 3 months.
Notes
For best texture use old-fashioned rolled oats, not quick oats. Stir natural peanut butter well before measuring. Add a pinch of flaky sea salt on top of the chocolate before it sets for a salted chocolate variation. To make vegan, substitute honey with pure maple syrup and use dairy-free chocolate chips.
Frequently Asked Questions
Can I use quick oats instead of rolled oats? You can, but the texture will be noticeably softer and the cups may not hold together as firmly. Old-fashioned rolled oats are strongly recommended for the best results.
Can I make these vegan? Yes. Simply swap the honey for pure maple syrup and ensure your chocolate chips are dairy-free. Most dark chocolate chips (especially 70% cacao and above) are naturally vegan, but check the label to be sure.
Why is my filling too dry or crumbly? This usually means the peanut butter is too thick or the honey wasn’t fully incorporated. Add an extra teaspoon of honey and a tiny drizzle of coconut oil, then mix again until the filling holds together when pressed.
Can I double the recipe? Absolutely. This recipe scales easily. A double batch fills two standard 12-cup muffin tins and stores beautifully in the freezer.
Do I need to use cupcake liners? Yes — they are essential. Without liners, the cups will stick to the tin and be nearly impossible to remove cleanly. Silicone liners are slightly easier to peel away than paper ones.
These No Bake Peanut Butter Oat Cups are one of those rare recipes that become instant household favorites. They’re fast, they require no baking skill, they use real, recognizable ingredients, and they deliver every time. Once you make your first batch, you’ll understand why so many home cooks keep their freezer stocked with them year-round.