
Follow Me On Social Media!
The Ultimate Guide to No Bake Peanut Butter Oat Cups: A Healthy Indulgence
In the world of snacks and desserts, there exists a perfect intersection where health meets hedonism. It is a place where the wholesome, hearty crunch of oats collides with the creamy, salty richness of peanut butter, all crowned with a decadent layer of smooth dark chocolate. Welcome to the definitive guide on making No Bake Peanut Butter Oat Cups.
If you have ever found yourself standing in the kitchen, craving something sweet yet substantial, but dreading the idea of preheating the oven or waiting for a cake to rise, this recipe is your savior. These oat cups are not just a treat; they are a lifestyle hack. They bridge the gap between a post-workout energy boost and a late-night comfort food. They are simple enough for a novice cook to master in minutes, yet sophisticated enough in flavor to serve at a casual gathering.
In this extensive guide, we will explore everything you need to know about creating these bite-sized masterpieces. We will dive deep into ingredient selection, the science of the “no-bake” binding process, variations to suit every dietary need, and tips to ensure your chocolate layer snaps perfectly every time.
Why This Recipe Will Become Your New Favorite
Before we get our hands sticky, let’s discuss why this particular recipe deserves a permanent spot in your culinary repertoire.
First and foremost, the convenience factor is unmatched. In our fast-paced lives, finding time to bake from scratch is a luxury we don’t always have. These cups require zero oven time. The “cooking” is essentially done by your refrigerator, which firms up the ingredients into a cohesive, fudge-like texture. This makes it a fantastic recipe for summer months when you want to avoid heating up the kitchen, or for dorm rooms and kitchenettes with limited appliances.
Secondly, the nutritional profile is superior to almost any store-bought alternative. Most commercial peanut butter cups are laden with preservatives, stabilizers, and excessive amounts of refined sugar. By making them at home, you control the sugar content. The base is powered by oats, a complex carbohydrate known for providing sustained energy and dietary fiber. Peanut butter adds healthy fats and plant-based protein, making these cups a satiating snack that keeps hunger at bay.
Lastly, they are highly customizable. Whether you are vegan, gluten-free, or looking to boost your protein intake, this recipe is incredibly forgiving and adaptable.
The Ingredients: A Closer Look
The beauty of this recipe lies in its simplicity. You likely have most, if not all, of these ingredients in your pantry right now. However, the quality of your ingredients will dictate the quality of your final product.
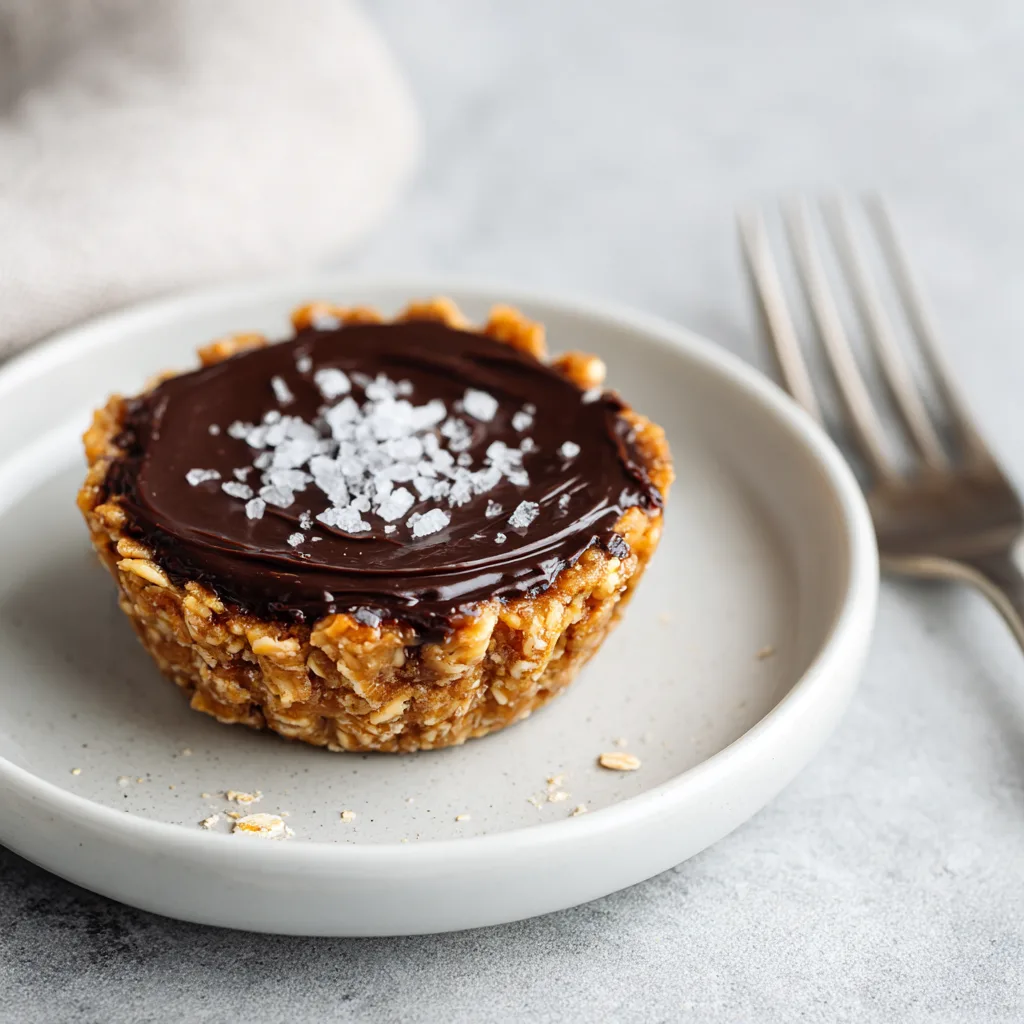
- Rolled Oats: These are the backbone of the recipe. Old-fashioned rolled oats are preferred over instant oats because they retain their texture better. Instant oats can become too mushy when mixed with the wet ingredients, losing that satisfying chewiness we are aiming for. If you need this recipe to be strictly gluten-free, ensure your package of oats is certified gluten-free, as cross-contamination is common in oat processing.
- Peanut Butter: This acts as the primary binder and flavor driver. Creamy peanut butter usually works best for a uniform texture, but crunchy peanut butter can add a delightful texture if you prefer it. Natural peanut butter (the kind that requires stirring) is excellent for health, but be aware that it can be runnier. If using natural PB, you might need slightly more oats to hold the shape.
- Sweetener (Honey or Maple Syrup): This liquid sweetener does double duty: it sweetens the base and helps bind the oats together. Honey offers a distinct floral note and is very sticky, which is great for binding. Maple syrup offers a woodsy, autumnal flavor and is the go-to choice for a vegan version.
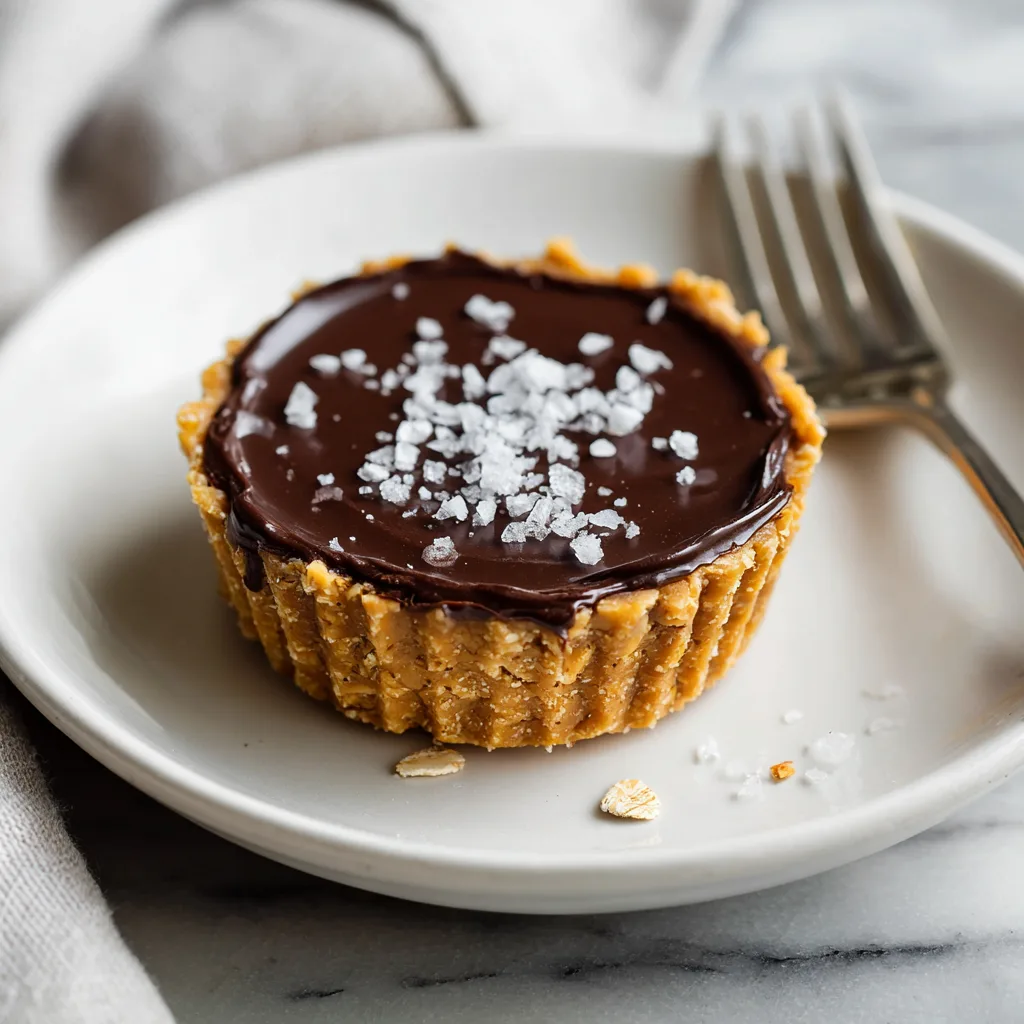
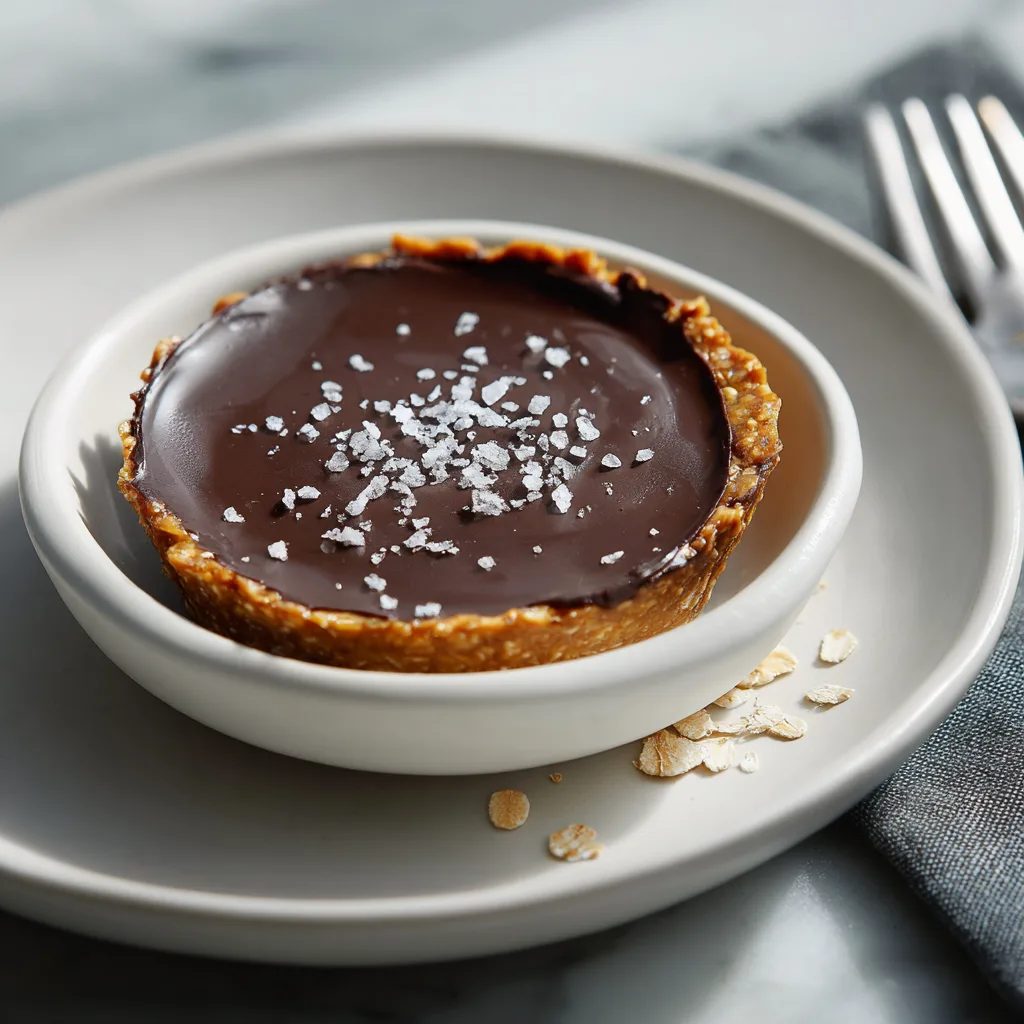
- Chocolate Chips: The crowning glory. Semi-sweet chocolate chips offer a classic balance of sweet and bitter. Dark chocolate chips (60% cocoa or higher) provide a sophisticated, intense chocolate hit and contain more antioxidants. Milk chocolate is an option for those with a serious sweet tooth, though it creates a much richer, sweeter cup.
- Coconut Oil: This is the secret weapon for the chocolate topping. Adding a small amount of coconut oil to the melting chocolate makes it smoother and easier to pour. More importantly, it prevents the chocolate from freezing into a rock-hard disc. It allows the chocolate to set but remain soft enough to bite through without cracking the oat base underneath.
- Vanilla Extract: A splash of vanilla rounds out the flavors, adding a bakery-style aroma that elevates the simple ingredients.
- Salt: Never underestimate the power of salt in a sweet recipe. A pinch of salt in the base highlights the peanut flavor, and a sprinkle of sea salt on top cuts through the richness of the chocolate.
Instructions
Making these cups is a process of layering. We build a solid foundation and top it with luxury.
- Prepare the Muffin Tin: Line a standard 12-cup muffin tin with paper liners. This is crucial for easy removal. If you don’t have liners, you can grease the tin heavily with coconut oil, but liners are much tidier.
- Mix the Wet Ingredients: In a large mixing bowl, combine the peanut butter, honey (or maple syrup), and vanilla extract. If your peanut butter is very stiff (like the bottom of a jar), pop it in the microwave for 15-20 seconds to soften it up. Whisk these together until fully combined and smooth.
- Add the Dry Ingredients: Pour in the rolled oats. If you are adding any dry mix-ins like flax seeds or chia seeds, add them now. Use a sturdy spatula or a wooden spoon to fold the oats into the peanut butter mixture. It will be thick and sticky. You want every single oat flake to be coated in the peanut butter “glue.”
- Form the Base: Divide the oat mixture evenly among the 12 muffin cups. A cookie scoop is a great tool for this to ensure even sizing. using the back of a spoon or your fingers (lightly oiled to prevent sticking), press the mixture firmly into the bottom of each cup. You want a compact, flat layer. The firmer you press, the better they will hold together when you eat them.
- Melt the Chocolate: In a microwave-safe bowl, combine the chocolate chips and the coconut oil. Microwave in 30-second intervals, stirring vigorously in between. Do not overheat, or the chocolate can seize and become grainy. Stop when the chocolate is mostly melted and stir until the residual heat melts the rest.
- Add the Topping: Spoon the melted chocolate over the packed oat bases. Tilt the tin slightly to help the chocolate spread to the edges, covering the oats completely.
- The Set: Place the muffin tin in the refrigerator for at least 30 minutes, or the freezer for 15 minutes. This chilling time is non-negotiable; it solidifies the coconut oil and peanut butter, turning the loose mixture into a solid cup.
- Serve: Remove from the fridge. Peel off the paper liners and enjoy!
Tips for Success
- The “Press” is Key: When putting the oat mixture into the cups, really pack it down. If the base is too loose, the cup will crumble when you bite into it.
- Room Temperature Ingredients: It helps if your peanut butter and syrup are at room temperature so they mix easily. Cold peanut butter can be tough to work with.
- Storage: These cups are best stored in the refrigerator. Because natural peanut butter and coconut oil melt at warm temperatures, leaving them on the counter on a hot day can lead to a messy (though still delicious) situation. They can be stored in an airtight container in the fridge for up to two weeks.
- Freezer Friendly: These freeze beautifully. Store them in a freezer-safe bag for up to 3 months. You can eat them straight from the freezer for a harder, chewier texture, or let them thaw for 5 minutes.
Creative Variations
Once you have mastered the basic recipe, feel free to get creative. The format of “binder + grain + topping” is a canvas for your culinary imagination.
- The “Almond Joy”: Swap peanut butter for almond butter, add a splash of almond extract, and sprinkle shredded coconut on top of the chocolate layer before it sets.
- Protein Powerhouse: Add a scoop of your favorite vanilla or chocolate protein powder to the oat mixture. You may need to add a tablespoon of milk or water to adjust the consistency if the powder dries it out too much.
- Crunch Factor: Mix chopped peanuts, walnuts, or crispy rice cereal into the oat base for added texture.
- Fruity Twist: Stir a handful of dried cranberries or raisins into the oat base for a “trail mix” vibe.
- Double Chocolate: Add a tablespoon of cocoa powder to the peanut butter and oat mixture for a chocolate base topped with chocolate.
Frequently Asked Questions
Can I use quick oats instead of rolled oats? Yes, you can. The texture will be different—much softer and less chewy. It will resemble a truffle more than a granola bar texture.
My mixture is too dry and won’t stick together. What do I do? This can happen if your peanut butter is very dry or if you measured the oats generously. Simply add more sticky liquid (honey/syrup) or peanut butter, one teaspoon at a time, until the mixture holds its shape when squeezed.
Is this recipe keto-friendly? As written, no, due to the oats and honey. However, you can make a keto version by substituting the oats with a mixture of shredded coconut and hemp hearts, using a sugar-free syrup, and using sugar-free dark chocolate chips.
Can I make these mini? Absolutely. Use a mini muffin tin. These make fantastic bite-sized treats for parties. You will likely get 24 minis from this recipe batch.
No Bake Peanut Butter Oat Cups
A delicious, healthy, and easy no-bake snack featuring a chewy peanut butter oat base topped with a smooth layer of chocolate.
Ingredients
Equipment
Method
- Line a standard 12-cup muffin tin with paper liners.
- In a medium bowl, mix together the peanut butter, honey (or maple syrup), and vanilla extract until smooth.
- Add the rolled oats to the peanut butter mixture and stir until the oats are completely coated and the mixture is sticky.
- Divide the oat mixture evenly into the 12 muffin cups. Press the mixture down firmly to create a flat, compact base.
- In a microwave-safe bowl, combine chocolate chips and coconut oil. Microwave in 30-second intervals, stirring in between, until completely melted and smooth.
- Spoon the melted chocolate over the top of each oat cup, spreading it to the edges.
- Place the muffin tin in the refrigerator for at least 30 minutes (or freezer for 15 minutes) to allow the chocolate and base to set.
- Store in the refrigerator in an airtight container.
Notes
Ensure you use gluten-free oats if you have a gluten allergy. Natural peanut butter may require slightly more oats to bind.
Conclusion
No Bake Peanut Butter Oat Cups are a testament to the fact that healthy eating doesn’t have to be boring or difficult. They require minimal effort but deliver maximum satisfaction. Whether you are meal-prepping for a busy week, looking for a kid-friendly kitchen project, or simply need a chocolate fix, this recipe delivers.
The combination of textures—the snap of the chocolate, the creaminess of the peanut butter, and the chew of the oats—creates a sensory experience that rivals any candy bar. Yet, unlike a candy bar, this treat fuels your body with fiber and protein. So go ahead, whip up a batch. Your future self, looking for a snack at 3 PM tomorrow, will thank you.